
20+ Simple Simple Christmas Nails — Easy DIY Ideas 2026
Simple Christmas nails are having a major moment — and honestly, it’s about time. You don’t need a three-hour salon appointment or professional-level art skills to get nails that look festive, polished, and completely put-together for the holidays.
These 20 easy DIY ideas are proof that less really is more. Each design uses basic techniques like dotting, striping, and sponging that any beginner can master, with polishes you probably already own. Pick your favorite, pour yourself some hot cocoa, and let’s get painting.
1. Classic Red With Gold Foil Flecks

Ever notice how the simplest red manicure suddenly looks expensive the moment a little gold shows up? That’s exactly the magic here. Paint your nails two coats of a true cherry red — something like OPI Big Apple Red — and let them dry completely. Then tear off tiny pieces of gold foil (you can get sheets for a few dollars at any craft store), press them onto one or two accent nails with tweezers, and seal everything with a glossy top coat.
The trick is restraint. You don’t need foil on every nail; two accent nails per hand is plenty, and the random, organic edges of the foil do all the visual work for you. This design flatters every nail shape, but it looks especially polished on short almond or oval nails.
💡 Quick Tip: Apply foil with the sticky side of a slightly tacky top coat — wait about 60 seconds after your base color so it’s set but still grabby.
2. Green Christmas French Tips

A French manicure goes full holiday when you swap the white tips for deep forest green. Start with a sheer nude or milky pink base — two thin coats so it stays soft and natural. Then use the green (try Essie Off Tropic or Sally Hansen’s Green with Envy) to paint just the free edge of each nail.
If your hand isn’t steady enough for freehand tips, don’t panic. French tip guides or a striping brush make this beginner-friendly, and any little wobble disappears under a shiny top coat. This look works beautifully on square and coffin shapes where the tip has room to show off.
For an extra festive touch, paint one nail per hand in solid green and add a tiny gold dot at the base. It takes thirty extra seconds and turns a simple mani into a statement.
3. Delicate Snowflakes on White

Nothing says Christmas morning quite like snowflakes. Paint your nails a crisp white — a slightly warm white like OPI Alpine Snow keeps things soft — and add one small snowflake to each ring finger using a thin nail art brush or a stamping plate. The rest of the nails stay clean and minimal.
- Keep the snowflake small and centered — oversized flakes read as busy, not elegant.
- A fine detail brush dipped in white polish works if you don’t own a stamping kit.
- Seal with top coat twice so the delicate lines don’t chip first.
This is one of the easiest designs to do on short nails since you only need room for a single tiny flake. It’s also incredibly forgiving: no two snowflakes are alike, so a slightly imperfect one still looks intentional.
💡 Quick Tip: Place the snowflake slightly toward the tip rather than dead center — it draws the eye outward and makes nails look a touch longer.
4. Candy Cane Stripe Accent

Remember licking the stripes off a candy cane as a kid? This design bottles that exact nostalgia. Paint all your nails a glossy white, then add diagonal red stripes to two accent nails using a thin striping brush — angle them the same direction on each nail for that classic peppermint look.
The key to clean stripes is loading your brush lightly and letting the white base dry fully first. If you drag the brush too fast, the red skips; too slow, it blobs. Practice on a piece of paper first — seriously, it helps.
💡 Quick Tip: Striping tape is your best friend here. Lay thin strips diagonally, paint red over the gaps, peel while wet, and your lines come out razor-sharp.
If stripes feel too fiddly, candy cane nail wraps exist and look surprisingly good — but honestly, the hand-painted version has a charm that stickers can’t match. Pair this design with a solid red on your toes for a coordinated holiday look that ties everything together.
5. Burgundy With a Gold Glitter Accent

Burgundy is the sophisticated cousin of Christmas red — rich, moody, and perfect for evening parties. Paint nine nails in two coats of a deep wine shade and give your ring fingers the full gold glitter treatment. A chunky glitter like Zoya’s Ziv or a gold holographic polish packs on dense coverage in two coats.
What makes this work is the contrast: the flat, velvety burgundy makes the glitter pop even harder. Keep the rest of your jewelry minimal — a simple gold band or thin bracelet — and let your nails be the jewelry. This combo looks stunning on almond and stiletto shapes.
This combination also works beautifully in reverse — gold glitter on most nails with burgundy accents — if you want more sparkle. For longevity, glitter accent nails tend to outlast regular polish since the texture hides tip wear. Expect this manicure to look fresh for a full week, and refresh the top coat on day four to keep the burgundy glossy.
6. Tiny Christmas Trees on Nude

Sometimes the cutest designs are the smallest ones. Start with a sheer nude base that matches your skin tone, then paint a tiny triangle Christmas tree on each ring finger — or on every nail if you’re feeling festive. A green polish, a thin brush, and a steady hand are all you need.
- Build the tree with three stacked triangles, widest at the bottom.
- Add a gold dot on top as the star and a few white dots as ornaments.
- Keep the tree small — no wider than a third of the nail — so it stays cute, not cartoonish.
This design is proof that simple Christmas nails don’t have to be boring. The negative space around each tiny tree is what makes it modern, and it works on any nail length, even super short ones.
For a coordinated look, paint the same tiny tree on one toenail too — it’s a cute hidden detail that makes the whole manicure feel intentional and thought-through.
7. Red Buffalo Plaid Check
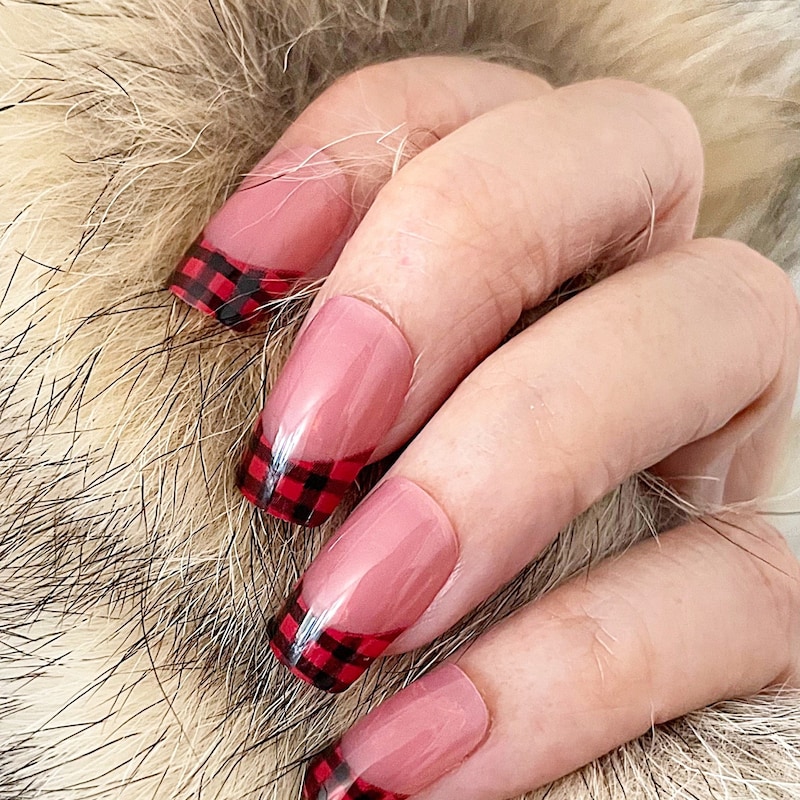
Buffalo plaid is basically a Christmas blanket for your nails. The pattern looks complicated but it’s just overlapping lines — paint a red base, then use black and white striping brushes to build the check. Start with wide vertical stripes, add horizontal ones, and finish with thin white lines where they cross.
Here’s the honest truth: your first nail will look rough. Your third will look great. Do your thumbs last once you’ve found your rhythm, since they’re the most visible. The slightly rustic, imperfect look actually suits plaid — it’s supposed to feel cozy, not precise.
💡 Quick Tip: Use a striping brush with long bristles and drag it across the nail in one smooth motion — short choppy strokes make wobbly lines.
Once you’ve mastered the classic red plaid, try the same technique in green and black for a forest-plaid variation, or cream and gold for something softer. The method is identical — only the colors change. Plaid also makes a fantastic accent: one plaid nail per hand with the rest in solid red gives you the cozy vibe without the full commitment.
8. Minimal Dot Garland
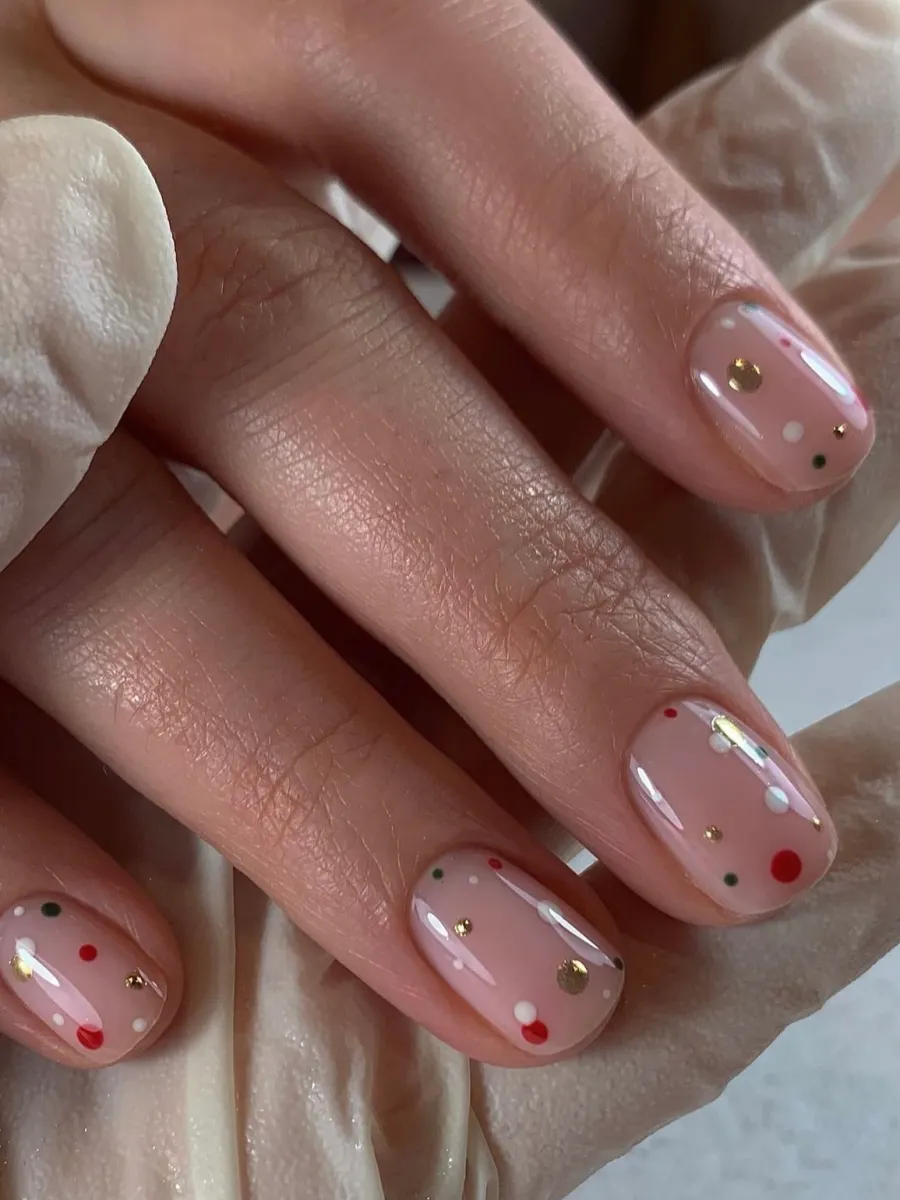
If freehand art intimidates you, dots are your way in. Paint a nude base, then use a dotting tool (or the end of a bobby pin) to arc a string of tiny dots across each nail like a garland — alternate red, green, and gold for a festive string of lights effect.
The beauty of this design is its simplicity. It takes ten minutes, requires zero drawing skill, and looks genuinely charming. Vary the dot sizes slightly — a few bigger dots scattered among the small ones reads as lights rather than just polka dots.
Finish with a glossy top coat to make the colors look juicy. This is a great design for kids or for a fun family matching-mani moment.
This is also a wonderful design to do with kids — the dotting is easy enough for little hands to help with, and the result looks genuinely festive. For a more grown-up version, use metallic gold and deep green dots on a dark base instead of the classic red-green-gold on nude.
9. Frosty Blue Ombré

Think of the blue hour on a snowy evening — that’s this manicure. The sponge ombré technique blends a pale icy blue into a deeper winter blue from cuticle to tip, and the effect is dreamy and effortless.
- Paint a white base first so the blues stay bright and true.
- Sponge on horizontal layers: pale blue at the cuticle, deep blue at the tip.
- Dab, don’t drag — rolling the sponge gives a smoother blend.
Clean up the edges with a small brush dipped in acetone before top coat. This look is especially pretty on oval and almond nails, and it pairs beautifully with silver jewelry and cozy gray sweaters.
To push this further into Christmas territory, add a single tiny white snowflake on each ring finger over the ombré — the blue gradient underneath makes the flake look like it’s floating in a winter sky. The ombré also camouflages regrowth beautifully, so this manicure stays looking fresh longer than a solid color.
10. Champagne Gold Glitter Fade
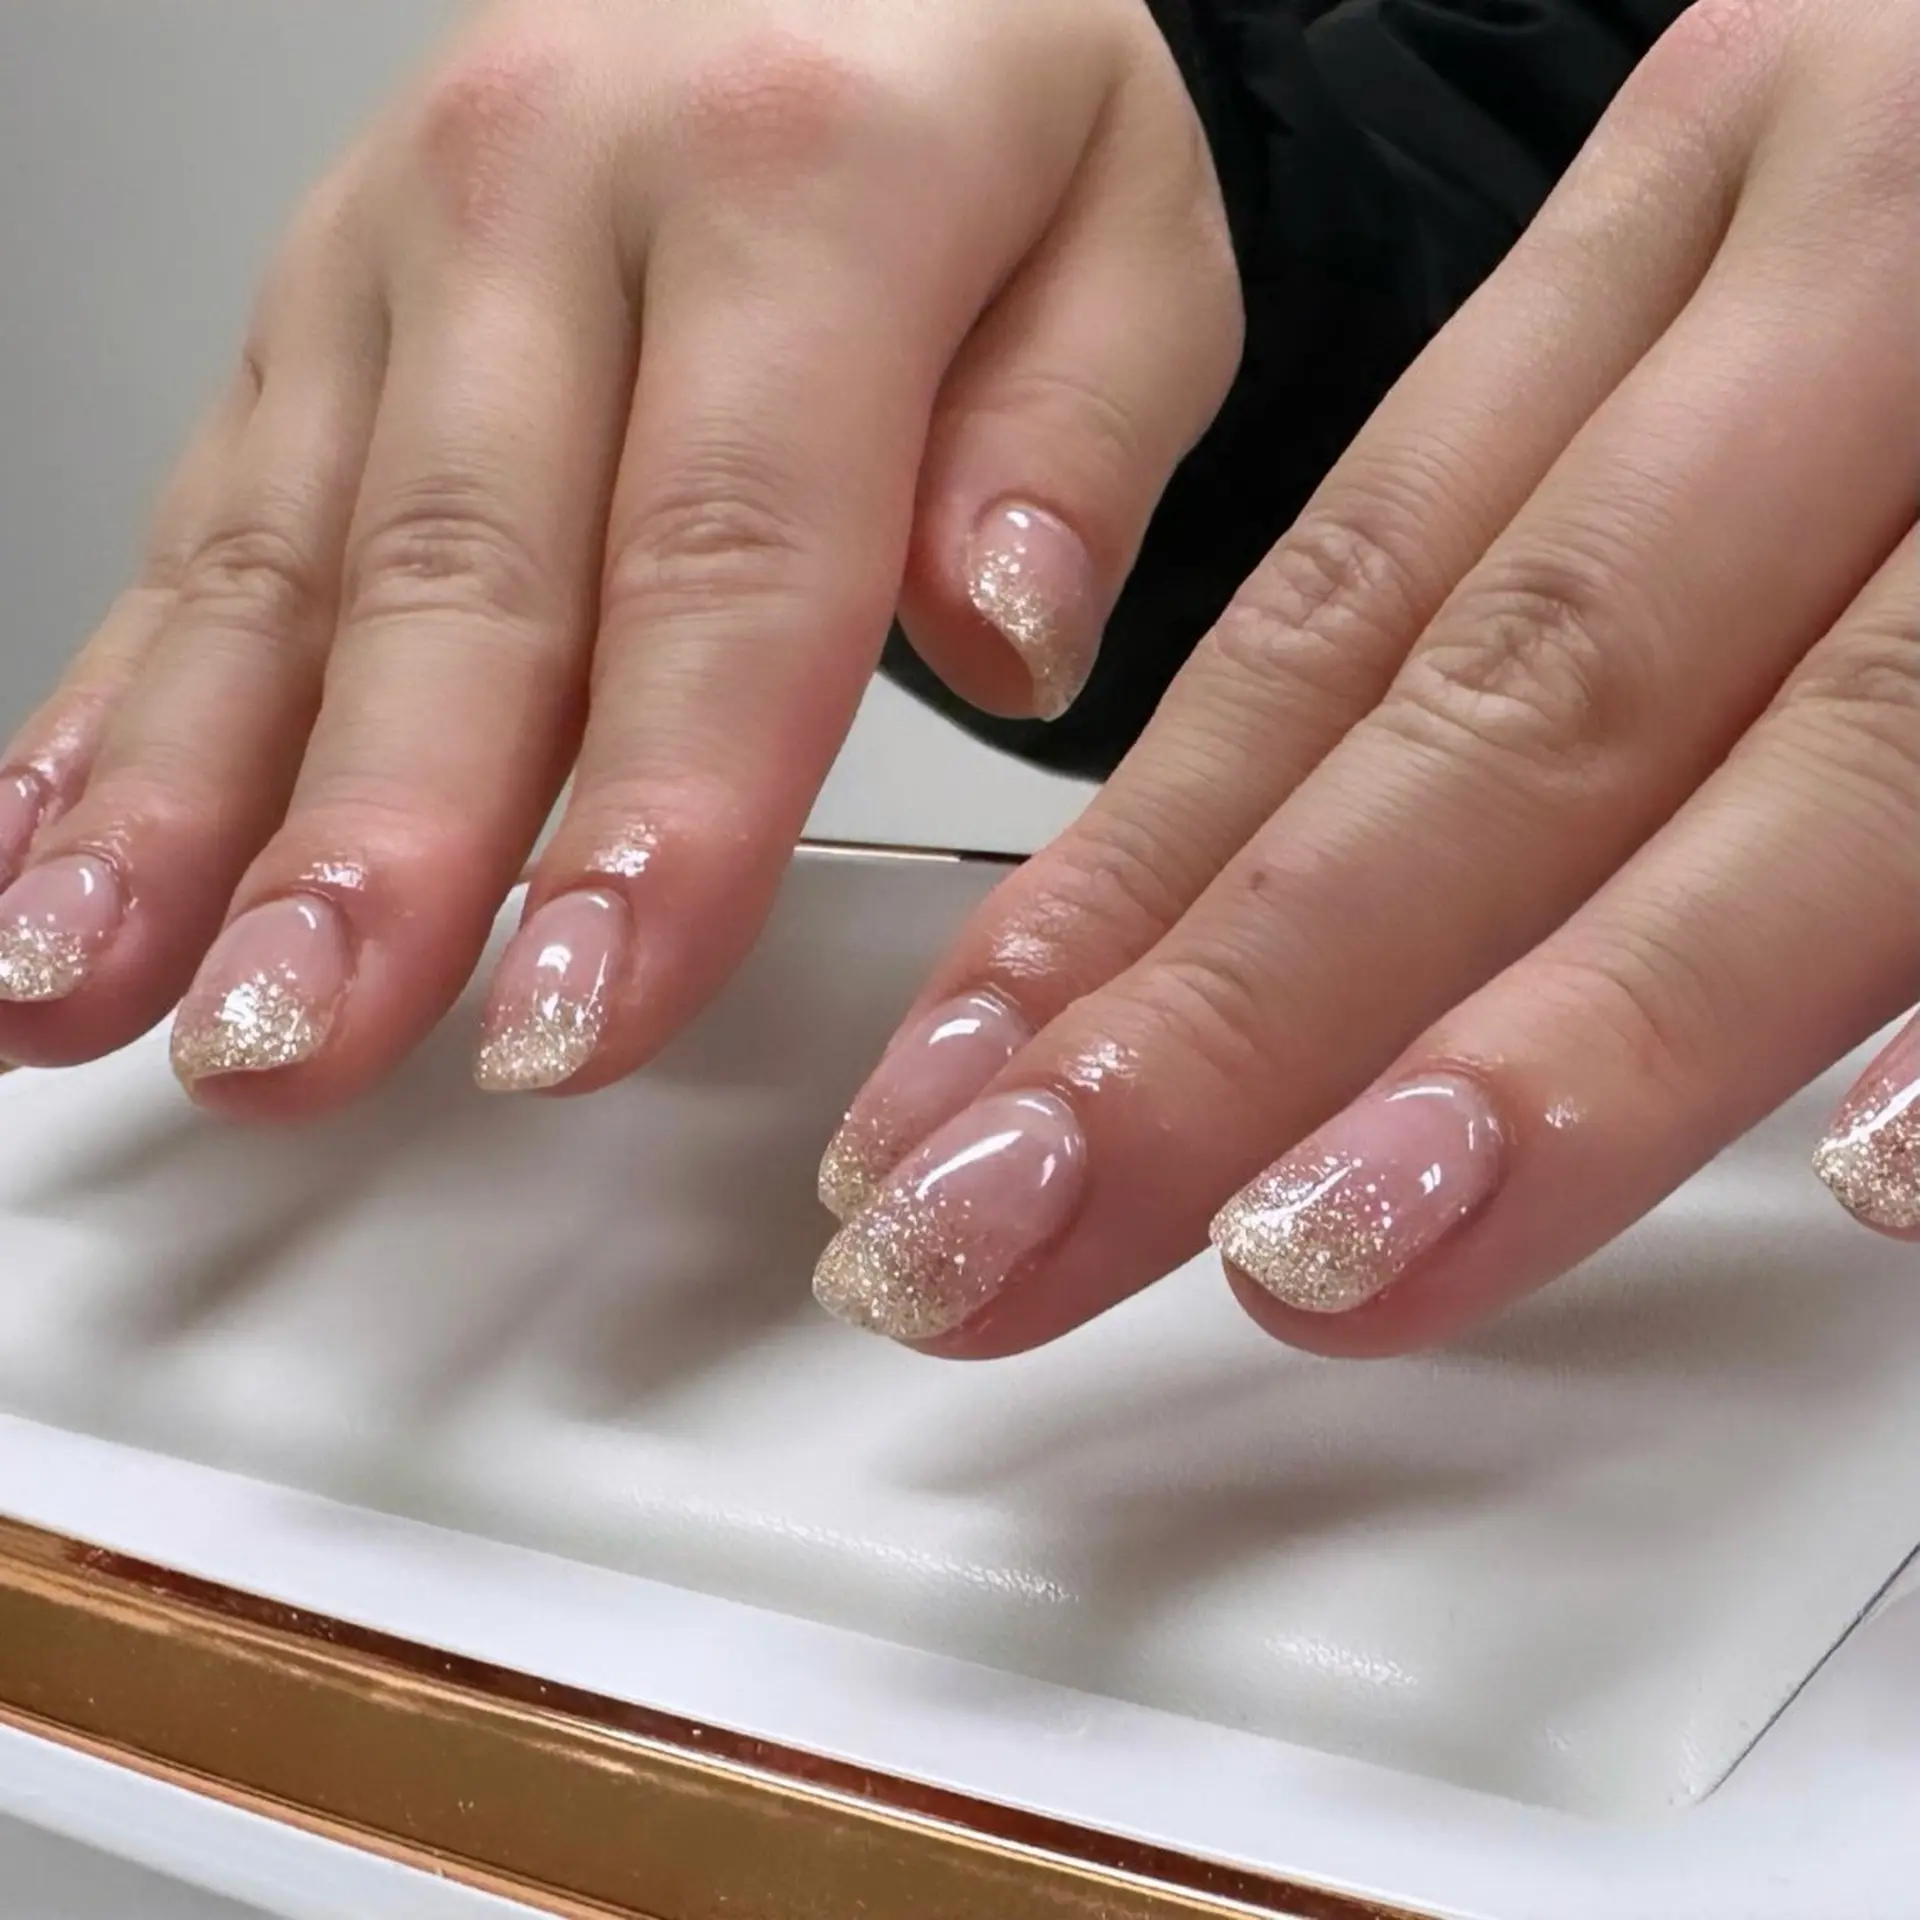
A glitter fade is the easiest way to look like you spent an hour on your nails when you spent fifteen minutes. Paint a nude base, then dab a champagne gold glitter polish starting at the tips and fading toward the middle. The densest glitter sits at the free edge and melts into nothing by the cuticle.
The secret is the sponge. Dab the glitter onto a makeup sponge, then press it onto the nail — this concentrates the sparkle exactly where you want it instead of smearing it everywhere. Two layers of dabbing gives you that rich, dense fade.
💡 Quick Tip: Wrap the very tip of the nail with the glitter too — it seals the edge and stops tip wear from showing.
This fade works with any glitter shade you own — try silver for a cooler look or rose gold for warmth. The technique is the same every time, which makes it a great formula to memorize: nude base, sponged glitter tips, glossy top coat. You’ll use it all season long.
11. Holly Berry Accent
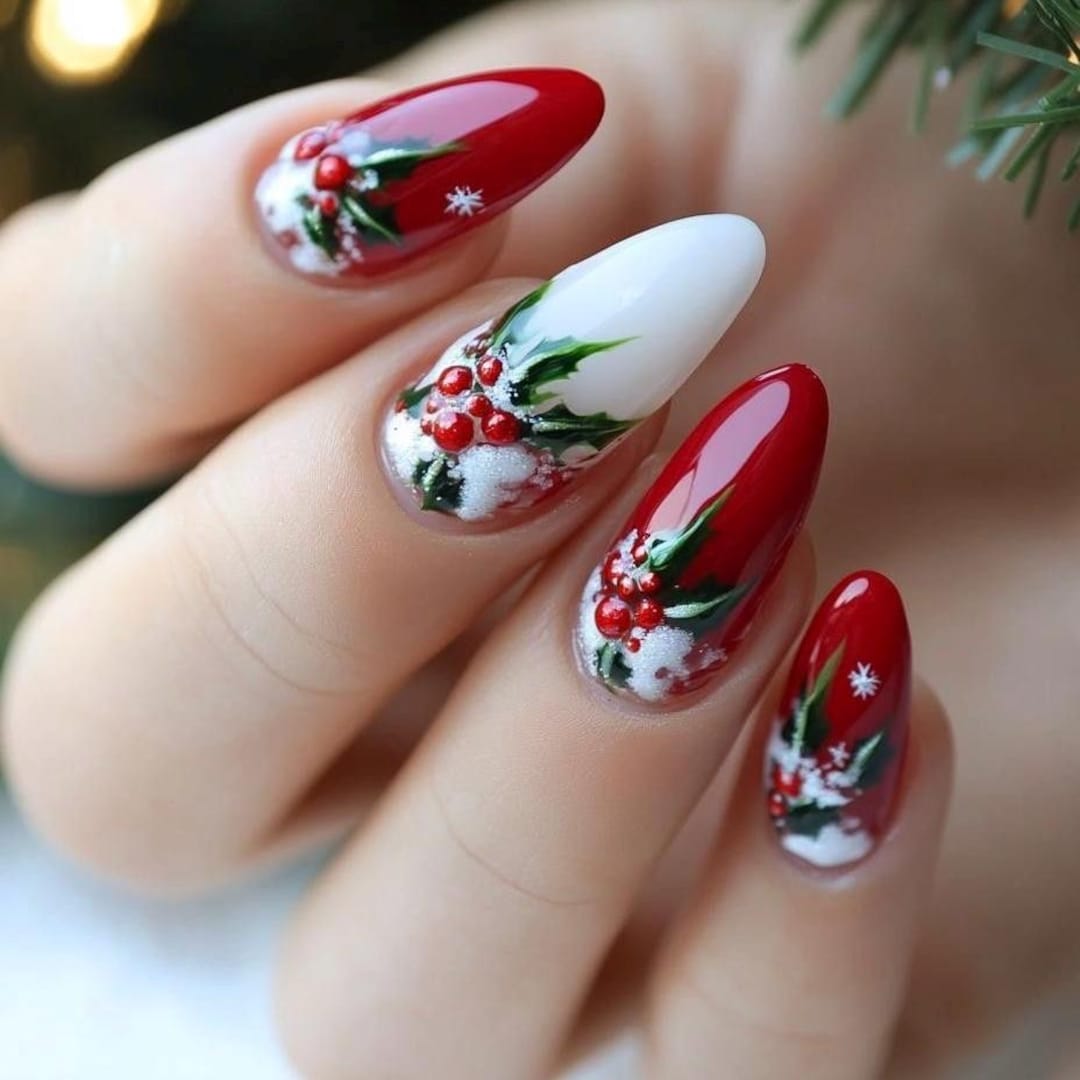
Holly is the underrated Christmas motif — everyone does trees and snowflakes, but a tiny sprig of holly berries feels fresh and classic. On a deep green or nude base, paint three small red dots clustered together and add two tiny green leaves with a detail brush.
Keep the holly to one or two accent nails; the rest of the manicure stays simple so the little sprig gets its moment. This design is lovely on short square nails where the flat tip gives the berries a nice canvas.
If freehand leaves scare you, use a small leaf-shaped stamp or even the corner of a dotting tool dragged slightly to make a leaf shape. Imperfect leaves still read as holly — nature isn’t symmetrical either.
For extra dimension, add a tiny white dot on each berry as a highlight — it makes them look round and juicy instead of flat. Holly also pairs beautifully with a deep green base on the other nails, so the accent sprig feels like part of a coordinated story rather than a random addition.
12. Cozy Sweater Knit Texture

This one is pure December coziness. Paint your nails a soft winter shade — cream, dusty blue, or cranberry — then use the same color (or one shade darker) to paint tiny cable-knit lines down the center of each nail with a thin brush. A matte top coat sells the wool texture.
- Work in vertical rows: two lines down the middle, chevron ticks on either side.
- Use slightly thicker polish for the knit lines so they sit raised.
- Matte top coat is non-negotiable — gloss ruins the sweater illusion.
It takes a little patience, but the result genuinely looks like a tiny knit sweater on your nails. Do all ten in the same shade for maximum cozy, or mix two complementary winter colors across your hands.
If the cable-knit feels too ambitious, a simpler version works just as well: vertical ribbed lines (like a ribbed sweater cuff) down each nail. It reads as knit instantly and takes half the time. Either way, this design begs to be paired with an actual cozy sweater — match your nail color to your favorite knit for the full effect.
13. Red and White Polka Dots

Polka dots are the cheerful, retro answer to Christmas nails. A glossy red base with white dots reads instantly festive — like wrapping paper come to life. Use a dotting tool with two sizes: big dots down the center, tiny dots filling the gaps.
Spacing matters more than perfection here. Leave breathing room between dots so each one pops against the red. If a dot goes wonky, wipe it off with an orangewood stick before it dries and redo it — dots are the most forgiving nail art there is.
💡 Quick Tip: Dip your dotting tool once and stamp two dots — the second one comes out slightly smaller, giving you natural size variation.
For a fun variation, flip the colors: white base with red dots. It reads more like falling snow with berries and feels slightly more modern. You can also add one gold dot among the white ones on each nail — a single metallic accent elevates the whole design from cute to chic without any extra skill required.
14. Dark Green With Gold Accents

Deep green and gold is the color story of a luxury Christmas — think velvet ribbons and candlelight. Paint your nails two coats of a rich emerald or forest green, then add thin gold details: a single stripe down one nail, a gold half-moon at the cuticle of another, tiny gold dots along the tips.
You don’t need every nail to match. An asymmetric mix — some nails plain green, some with gold details — looks modern and intentional. This palette is stunning against gold jewelry and dark winter coats.
For the gold, a metallic striping polish or a fine gold art pen gives you the most control. Finish with a glossy top coat to make the green look liquid and the gold gleam.
This palette is incredibly photogenic — the deep green and gold combination looks luxurious in every lighting, from office fluorescents to candlelight. If you’re doing your nails for holiday photos, this is a strong contender. Keep your hand jewelry to gold tones to stay in the same warm family.
15. Candy Cane French Tips

Take the classic French manicure and give it a peppermint twist: paint the tips with red and white diagonal stripes instead of plain white. The base stays sheer pink or nude, so the striped tips are the star of the show.
- Paint the white tip first, let it dry, then add thin red diagonal stripes.
- Angle all the stripes the same way for a cohesive peppermint look.
- Keep tips narrow — a thin smile line reads more elegant than thick tips.
This design is perfect for the office holiday party: festive but still polished enough for a professional setting. It looks especially crisp on almond and oval shapes.
If freehand stripes on the small tip area feel cramped, do the peppermint stripes on just the ring fingers as full-nail accents and keep the other eight nails as classic white-tip French. You get the festive detail without fighting for space on every fingertip.
16. White Tips With a Red Heart

Here’s a sweet little twist on the French manicure: classic white tips, but with a tiny red heart painted on one nail — usually the ring finger. It’s romantic, festive, and takes about two minutes once your tips are done.
Paint the heart with a dotting tool: two dots side by side, then drag them down into a point with a toothpick or thin brush. It doesn’t have to be perfect — at that size, a slightly imperfect heart still reads clearly as a heart.
💡 Quick Tip: Place the heart slightly off-center toward the cuticle — dead-center hearts can look stiff, while an off-center one feels playful and modern.
This sweet design isn’t just for Christmas — it works for Valentine’s Day too, which makes it a great two-for-one. For the holidays, try placing the heart on a deep red base with white tips instead; the inverted version feels bolder and more festive while keeping the same romantic charm.
17. Silver Stars on Navy

Midnight blue with silver stars is Christmas Eve in a manicure. Paint your nails a deep navy — almost black — and scatter tiny silver stars across a few accent nails. Star stickers or a stamping plate make this effortless, but a steady hand and a thin brush work too.
The key is varying the star sizes. A couple of larger stars mixed with tiny ones creates depth, like a real night sky. Keep the stars to two or three nails per hand so the design stays elegant rather than busy.
A silver chrome or holographic polish makes the stars catch the light when you move your hands — perfect for evening events. This is one of the most complimented simple designs, and it takes almost no skill.
For New Year’s Eve, this same manicure works perfectly — just add a few more stars and a touch of silver glitter at the tips. It’s one of those rare designs that genuinely spans both holidays, saving you a mid-season repaint.
18. Peppermint Swirl

The peppermint swirl is a step up from stripes — a spiral that radiates from the center of the nail like a real peppermint candy. Start with a white base, then use a thin red brush to spiral outward from the middle. It takes a little practice, but the payoff is huge.
- Work from the center outward in one continuous spiral motion.
- Keep the red lines thin — thick lines overwhelm the swirl.
- Do this on accent nails only and keep the rest solid red or white.
If the spiral feels too fiddly, there’s a cheat: paint concentric red circles and drag a toothpick from the center outward to pull them into a swirl. Either way, the result is playful and unmistakably Christmas.
The swirl looks most impressive on slightly longer nails where the spiral has room to breathe — if your nails are short, keep the swirl to one accent nail and do simple stripes on the others. Either way, seal with an extra layer of top coat; the red-on-white design shows chips faster than most, and the added protection buys you several more days.
19. Minimalist Gold Lines on Nude
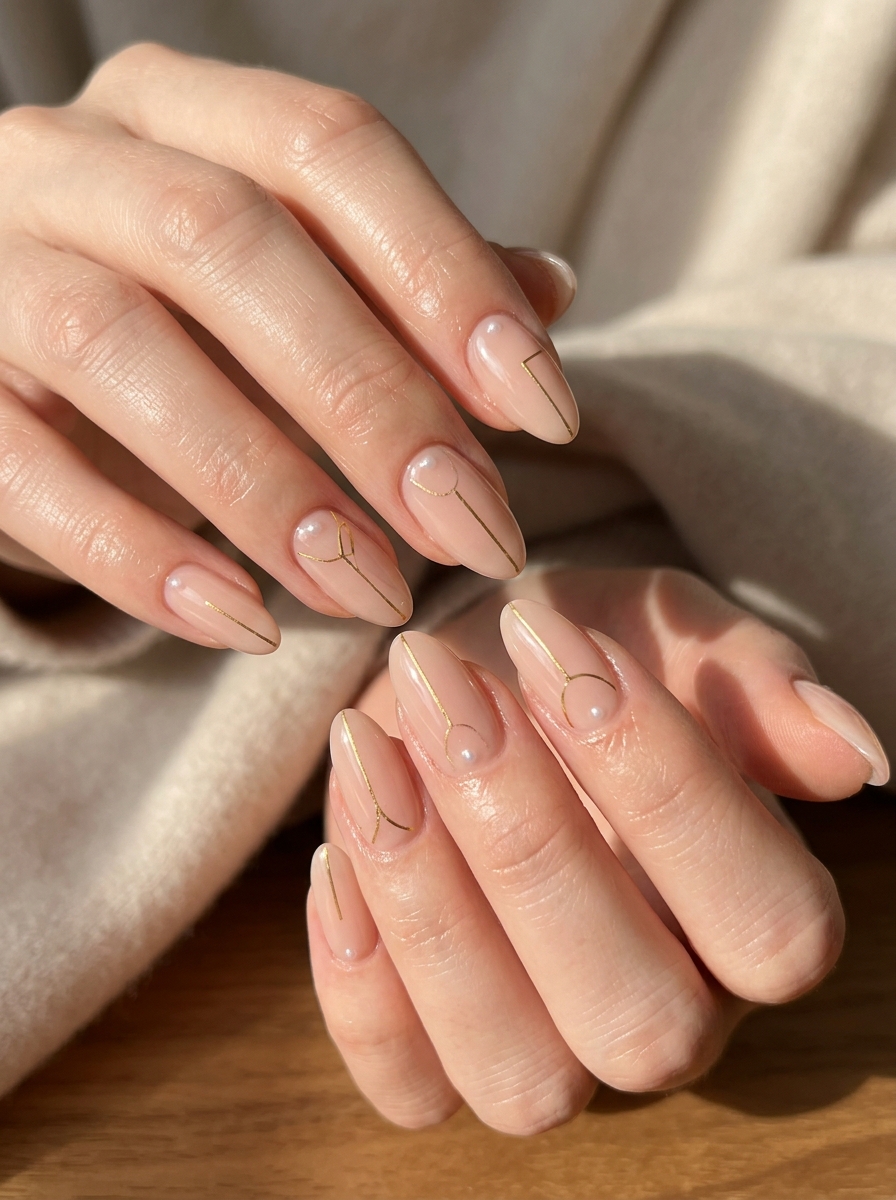
For the minimalist who still wants a nod to the season, thin gold lines on a nude base are perfection. A single vertical gold stripe down the center of each nail, or a tiny gold chevron near the tip — that’s it. No glitter, no fuss, just clean geometry.
This is the design that works with literally everything: your office wardrobe, your holiday party dress, your pajamas on Christmas morning. A gold striping polish or thin nail tape gives you the crispest lines.
💡 Quick Tip: Vary the line placement slightly across nails — center on some, offset on others — for a modern, editorial feel instead of a uniform look.
The minimalist approach also means this manicure grows out gracefully — there’s no obvious tip or art to betray regrowth. It’s the lowest-maintenance festive option on this list. For a subtle seasonal upgrade in the final week of December, add a single tiny gold dot at the base of each line, like an ornament on a branch.
20. Green Chrome Shine
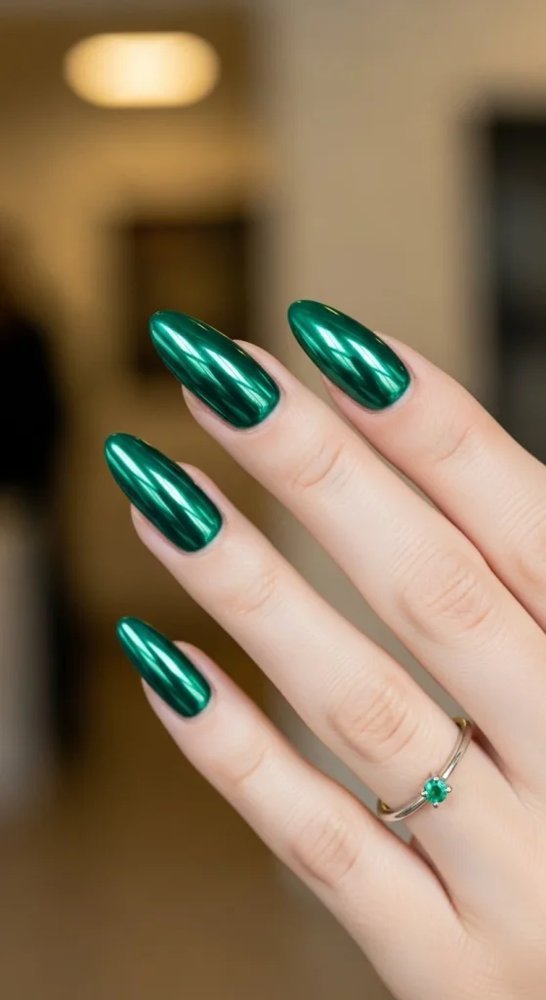
Chrome powder is the fastest way to make simple nails look expensive. Paint your nails a dark green base, cure if you’re using gel (or let regular polish get tacky), then buff green chrome powder over the surface with a silicone applicator. The mirror-like finish is instant drama.
Green chrome catches light like a Christmas ornament, and it needs zero nail art to make an impact. If you want a little extra, add a single gold dot at the cuticle of each nail — but honestly, the chrome alone is enough.
Seal it with a no-wipe top coat to lock in the mirror effect. This look lasts beautifully and photographs incredibly well, making it a favorite for holiday parties and New Year’s Eve too.
Green chrome is surprisingly versatile beyond Christmas — it reads as jewel-toned and luxe all winter long. If you want to tone down the holiday specificity for January, the same chrome over a deep teal or navy base feels wintry without screaming December.
CONCLUSION
Whether you went for classic red and gold or something playful like peppermint swirls, the best Christmas manicure is the one that makes you smile every time you look at your hands. 📌 Save this post to your Christmas nails board on Pinterest so you have festive nail inspiration ready!