
25+ Easy Wedding Hairstyles 2026 — Beautiful Ideas
You got the wedding invitation, you found the dress — and now you’re staring at your reflection wondering what on earth to do with your hair. Sound familiar? Here’s the thing: looking gorgeous for a wedding doesn’t require a salon appointment or professional-level skills.
Every hairstyle in this list is genuinely DIY-friendly. We’re talking updos you can do in your bathroom mirror, braids that look complicated but aren’t, and curls that survive the dance floor. Pick your favorite, give it one practice run, and you’ll walk in feeling like the best version of yourself.
1. The Low Twisted Chignon

There’s a reason stylists reach for the chignon when a client says “elegant but effortless.” Gather your hair into a low ponytail at the nape, split it into two sections, and twist each one away from your face. Then wrap the twists around each other, coil the whole thing into a bun, and pin as you go. The magic is in the looseness — pull a few pieces free around your hairline before you start, and tug gently at the finished bun to soften it.
A light mist of texturizing spray beforehand gives fine or slippery hair something to grip. Finish with a flexible-hold hairspray, and you’ve got a style that photographs like you spent an hour when it took fifteen minutes. It works beautifully with statement earrings and an off-the-shoulder neckline. If your hair is very long, divide it into three twists instead of two for better control. And don’t stress about symmetry — a chignon that’s slightly imperfect looks more modern and romantic than one that’s mathematically precise.
2. Romantic Half-Up Twist

Half-up styles are the sweet spot for wedding guests — polished enough for photos, relaxed enough to dance in. This twisted version takes about ten minutes and flatters nearly every face shape.
- Section: Take a two-inch section from each temple and twist them back toward the crown.
- Secure: Cross the twists over each other and pin with two bobby pins in an X shape.
- Soften: Gently pull the twists apart (pancaking) so they look fuller and more romantic.
- Curl the rest: Loose waves through the lengths with a 1.25-inch curling iron complete the look.
Add a small jeweled pin or a sprig of baby’s breath where the twists meet, and suddenly your DIY style looks straight out of a bridal editorial. For extra staying power, crisscross two more bobby pins vertically through the X. This style also transitions beautifully from ceremony to reception — if pieces loosen while dancing, just tuck them back and keep going.
3. The Classic Three-Strand Braid Bun

If you can braid, you can do this — it’s that simple. Make a low ponytail, braid it in a regular three-strand braid, and secure the end with a clear elastic. Then wrap the braid around its own base, tucking the end underneath, and pin generously with bobby pins. Fan the braid out slightly with your fingers as you wrap so it looks lush rather than skinny.
💡 Quick Tip: Slightly dirty hair — or a pump of mousse worked through first — gives the braid the grip it needs to hold together and look soft rather than slippery. Pull a few shorter layers loose around your crown before braiding for softness, smooth stray ends with a dot of pomade, and finish with a light-hold spray. The result is a bun that looks touchable and romantic, never stiff or overdone — and it holds from the ceremony through the last dance.
4. Effortless Messy Textured Bun

What if the secret to a perfect messy bun is… not trying for perfect? Start with a high ponytail, backcomb it lightly at the roots for grip, then twist the tail loosely and wrap it around the base. Pin wherever it feels right — the asymmetry is the point. Pull out face-framing pieces and a few strands at the nape.
The key tool here is texturizing spray. Spritz it through the lengths before you start, and the bun practically builds itself — the spray gives your hair that gritty, piece-y texture that makes “undone” look intentional instead of accidental. Finish with a medium-hold spray, and don’t touch it again. Seriously. The more you fuss, the less effortless it looks. A decorative pin or a sprig of greenery tucked into the side instantly makes this wedding-appropriate. The beauty of the messy bun is that it looks better as the day goes on — embrace the evolution.
5. Soft Loose Curls With a Curling Iron

Sometimes the most beautiful wedding hairstyle is simply your hair, but better. Wash and blow-dry smooth, then curl one-inch sections with a 1.25-inch curling iron, always wrapping away from your face. The trick most people miss: let each curl cool completely in your palm for five seconds before you let it drop. That one pause is the difference between curls that last all night and curls that fall flat by the cocktail hour.
Once every section is curled, flip your head upside down and shake gently, then run your fingers through — never a brush — to break the curls into soft waves. A light-hold spray keeps everything touchable. This is the style that goes with literally every dress in your closet. If your hair struggles to hold curl, mist each section with light hairspray before wrapping it around the iron. And always curl the front pieces away from your face — it opens up your features in photos.
6. The Sleek Low Ponytail

Don’t underestimate the power of a truly polished ponytail. This is red-carpet territory when you do it right, and it takes under ten minutes.
- Prep: Blow-dry with a paddle brush, then flat-iron the lengths for glass-like smoothness.
- Position: Gather hair at the nape — low is elegant, mid-height is modern. Brush from every angle to eliminate bumps.
- Hide the elastic: Wrap a thin strand of hair around the band and pin underneath. This one detail elevates everything.
- Finish: A pea-sized drop of shine serum on the tail, and a firm-hold spray at the crown to tame flyaways.
Pair it with a bold lip and statement earrings — minimal hair means your accessories get to shine. For added drama, create a deep side part before smoothing everything back; the asymmetry adds instant polish. It pairs beautifully with a veil or statement headpiece since there’s no competing crown volume, and this red-carpet staple suits every dress code from garden party to black tie.
7. Braided Low Bun

This one looks like it came from a bridal salon, but it’s just two techniques stacked together. Start with a deep side part, then Dutch-braid (braiding under instead of over) along your hairline from the part down to the nape on one side. Gather everything — the braid plus the rest of your hair — into a low ponytail, twist it into a bun, and pin.
📌 Good To Know: The Dutch braid is what makes this special — because it sits on top of the hair instead of blending in, it creates a gorgeous raised, dimensional effect along your hairline. Gently tug the edges of the braid outward (pancaking) before you bun the rest, and it’ll look twice as thick. If Dutch braiding feels tricky, a regular French braid works too — you’ll just get a flatter, more blended effect. Either way, keep the braid snug; looseness here reads messy rather than romantic.
8. Side-Swept Old Hollywood Waves

Want to feel like a movie star? Sweep everything to one side and go full glamour. Create a deep side part, then curl every section with a 1-inch curling iron, wrapping all the curls in the same direction. While each curl is still warm, pin it flat against your head with a duckbill clip and let them all cool completely — this “set” step is what gives you those smooth, sculpted waves instead of bouncy curls.
Once cool, remove the clips and brush through gently with a soft bristle brush. The curls will melt into one continuous, glossy wave. Tuck the smaller side behind your ear and pin with something sparkly. One side stays sleek and close to the head while the other cascades — it’s drama in the best possible way. A strong-hold spray is essential — brush through the waves first, then mist generously and don’t touch. These waves look most authentic when every curl flows in the same direction, so take your time with sectioning.
9. The Waterfall Braid Half-Up

The waterfall braid looks impossibly intricate, but the technique is just a French braid where you drop one strand each time and pick up a new one. Start at your temple with three small sections. Each time you’d cross the bottom strand over, drop it and pick up a fresh piece of hair from just behind it. Work across the back of your head to the other side, then pin the end under the top layer.
- Best on: Hair that’s at least shoulder-length, with some wave or curl already in it.
- Prep: A little sea-salt spray helps the “dropped” strands stay visible instead of blending in.
- Finish: Curl the loose lengths and the dropped strands for a cascading, romantic effect.
Practice this one twice before the wedding — the dropping motion feels strange the first time, then suddenly clicks. Once you’re comfortable, try two waterfall braids meeting in the middle at the back, joined with a decorative clip. It’s a gorgeous upgrade that takes only a few extra minutes.
10. Dutch Braid Crown

A crown braid is basically a halo of braid around your head, and the Dutch version (braiding under) makes it pop beautifully. Start behind one ear and Dutch-braid along your hairline, adding hair from both sides as you travel around your head. When you reach the start, braid the remaining tail and tuck it under the beginning of the braid, pinning securely.
This style is a lifesaver if you’re worried about humidity or dancing — everything is anchored to your head, so it genuinely doesn’t move. It also keeps hair off your neck, which you’ll appreciate at a summer wedding. Leave a few wispy pieces out at the front for softness, and you’re done. No curling iron required. Tuck a few small fresh flowers into the braid for a garden ceremony, or keep it clean and minimal for a city wedding. Either way, this is one style you genuinely won’t have to think about again all day.
11. The Polished Top Knot

A top knot for a wedding? Absolutely — when it’s sleek and intentional rather than gym-hair. The difference is all in the prep. Blow-dry smooth, brush everything up to the crown, and secure with a strong elastic. Twist the ponytail tightly, wrap it around the base, and pin. Then take a fine-tooth comb and smooth the crown and sides until they’re glassy.
💡 Quick Tip: For a truly polished finish, tie a silk scarf or add a structured hair accessory at the base of the knot. And here’s the non-negotiable: edge control or a toothbrush with hairspray to lay down every single baby hair. Sleek is the whole point of this look — commit to it fully. Balance the height of the knot with your dress neckline — a high knot pairs best with strapless or off-the-shoulder styles. Keep your makeup soft and glowing; the sleek hair is statement enough.
12. Low Side Chignon

There’s something quietly romantic about a bun that sits just off-center. Sweep all your hair to one side at the nape — whichever side feels natural — and twist it loosely into a low bun. Secure with bobby pins, then gently pull at the bun to make it soft and a little undone. The asymmetry gives it a modern, editorial feel that a centered bun just doesn’t have.
This is a wonderful choice if you’re wearing a one-shoulder dress or an asymmetrical neckline, since it balances the visual weight. Leave a deep side part and let a few curled tendrils frame the opposite side of your face. It takes ten minutes, photographs beautifully from every angle, and stays put through hugs, dancing, and happy tears. This style is wonderfully veil-friendly — the off-center placement leaves plenty of room for a veil comb on the opposite side. It’s also kind to second-day hair, which grips pins better.
13. Curly High Ponytail
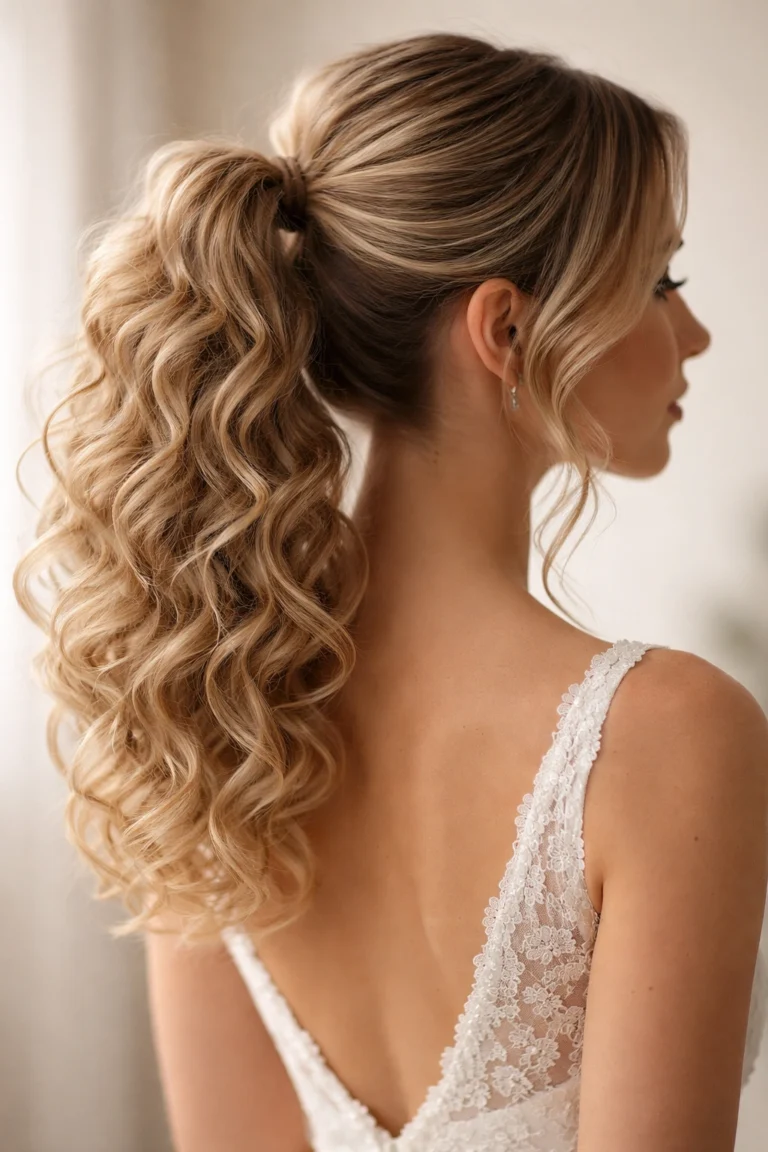
Big, bouncy, and full of joy — a curly high ponytail is pure celebration energy. The trick to making it wedding-worthy instead of everyday is volume at the crown and polish at the base.
- Build volume: Tease the crown lightly with a fine-tooth comb before gathering hair up.
- Go high: Position the ponytail at the crown — tilt your chin down and brush everything upward for the smoothest result.
- Curl in sections: Once secured, curl the tail in one-inch sections with a 1-inch iron, alternating directions.
- Wrap the base: Hide the elastic with a strand of hair for that finished, intentional look.
Shake the curls out gently and mist with flexible-hold spray. You’ll get compliments all night — this style has main-character energy. Wrap a small section of hair around the base and secure it with a pin for a seamless finish. If your ponytail tends to droop, two stacked elastics or a ponytail bump insert will keep it sky-high all night.
14. The Bubble Ponytail

Remember when ponytails were boring? The bubble ponytail changed everything. Secure a ponytail at your preferred height, then add clear elastics every two inches down the tail. Gently pull each section outward to create full, rounded “bubbles.” That’s genuinely the entire technique — it takes five minutes and looks like you hired someone.
If your hair is fine, tease each section lightly before puffing it out — the added texture makes every bubble rounder and fuller. And don’t worry about perfection: slightly uneven bubbles look more modern and editorial than identical ones.
For a wedding, keep the crown sleek and smooth — bumps are what make this look casual rather than elegant. Wrap the top elastic with hair, use small clear elastics that disappear, and vary the bubble sizes slightly for a more editorial, less uniform feel. Tuck tiny pearl pins between a few bubbles for sparkle, and you’ve got a playful style with hours of hold and zero bobby pins.
15. Fishtail Side Braid

The fishtail braid has a reputation for being difficult, which is honestly unfair — it’s just two sections instead of three. Divide your hair into two halves. Take a thin strand from the outside of the left section and cross it over to the right. Then take a thin strand from the outside of the right section and cross it to the left. Repeat all the way down. Smaller strands mean a more intricate, detailed braid; bigger strands go faster.
Sweep it over one shoulder and pancake it generously — pull each section outward so the braid looks thick and textured. Secure with a clear elastic, then wrap a strand of hair around it. The fishtail’s woven texture catches light beautifully in photos, making it a favorite for outdoor and golden-hour weddings. Drape the braid over the shoulder opposite your dress’s standout detail to keep the overall look balanced. A light mist of shine spray on the finished braid makes the woven texture gleam in photos.
16. Twisted Half-Up With Curls

Take the simplest half-up style and add one upgrade: instead of just pulling hair back, twist it. Take a section from each side, twist them toward the back of your head, and join them with a clear elastic or a decorative clip. The twists add texture and dimension that a plain half-up ponytail lacks, and they hold better too.
⚠️ Watch Out: Twist in the same direction on both sides, or the twists will unravel each other where they meet. And don’t pull the front sections too tight — half-up styles look best with a little softness at the crown. Tease the crown lightly before you start, and you’ll get that pretty lifted shape instead of a flat, severe look. If you have layers, let the shorter ones fall free around the twists — it adds to the romantic effect. This is also a great style for showing off balayage or highlights, since the twists display the dimension.
17. Center-Part Sleek Low Bun

Minimalism is having a moment, and this is its hairstyle. A precise center part, hair smoothed flat to the head, gathered into a neat low bun at the nape. There’s nowhere to hide with this look — which is exactly why it reads so confident and chic. It pairs perfectly with architectural jewelry, a bold red lip, or a dramatic eye.
The execution demands discipline: flat-iron the roots smooth, use a boar-bristle brush to get everything sleek, and don’t skip the shine serum. Tame flyaways with a light-hold spray on a clean mascara wand — it’s the perfect tool for precision. The bun itself can be a simple twisted coil; the sleekness is the star, not the bun’s complexity. A center part demands symmetry, so take a moment to check both sides in a hand mirror. This minimalist style is the perfect canvas for dramatic earrings — let them be the focal point.
18. The Romantic Braided Updo

When you want an updo with a little more poetry, combine loose braids with a soft bun. Here’s the formula that never fails:
- Braid first: Make two loose three-strand braids, one on each side of a center part.
- Pancake: Pull both braids apart gently so they’re wide, soft, and romantic.
- Gather: Bring the braids plus all remaining hair into a low, loose bun at the nape.
- Pin and pull: Secure with bobby pins, then tug pieces free around your face and at the crown.
The result is textured, dimensional, and soft — the kind of updo that looks better as the evening goes on and a few pieces escape. Weave a thin velvet ribbon through one braid in your wedding palette for a personal touch, keep everything loose and intertwined rather than precise, and let the braids’ natural dimension do the talking. It’s made for rustic, garden, or bohemian celebrations.
19. Voluminous Blowout Waves

A salon blowout is the ultimate wedding-guest hair — bouncy, shiny, and full of movement. You can absolutely do it yourself with a round brush and some patience. Rough-dry your hair until it’s 80% dry, then work in sections with a large round brush, rolling each section up and blasting it with heat. The key move: after heating each section, blast it with the cool shot button while it’s still wrapped around the brush. That cool-down sets the shape.
📌 Good To Know: Velcro rollers are the cheat code here. After blow-drying each section, roll it up in a large velcro roller and leave them all in while you do your makeup. When you take them out, you’ll have volume and wave that lasts for hours — no curling iron needed. Finish with a shine spray for that just-left-the-salon gloss. For maximum volume that lasts, flip your head upside down and mist the roots with dry shampoo before the final shake-out. The added grip keeps the lift going for hours.
20. Double Dutch Braids Into a Bun

Two Dutch braids running from your hairline to the nape, joined into a single bun — this style is secure, striking, and surprisingly easy. Part your hair down the middle, Dutch-braid each side (underhand, adding hair as you go), and secure both at the nape. Twist the two tails together into one bun and pin.
Take your time with the parting — a clean center part is the foundation this style’s symmetry depends on. If your arms get tired halfway through, rest them; even tension matters more than speed for braids this visible.
What makes this special is the symmetry: the two braids frame your face and lead the eye straight to the bun, creating a beautiful sculpted effect. Pancake them generously for extra fullness — it’s also one of the most dance-proof styles here, since braids anchored close to the scalp don’t budge. The flat profile sits smoothly under a veil, and small pearl pins along the part lines add a delicate bridal-guest sparkle.
21. The Knotted Low Ponytail

Here’s a party trick disguised as a hairstyle: you literally tie your hair in knots. Divide a low ponytail into two sections and tie them in a simple overhand knot, then another, working down the tail. Secure the end with a clear elastic and tuck it under. The knots create a gorgeous rope-like texture that looks incredibly intricate.
It works best on medium to long hair — the longer the tail, the more knots you get, and the more dramatic the effect. Keep the crown smooth and polished so the contrast with the textured tail really pops. Add a drop of shine serum to the knots to define them. Guests will ask who did your hair, and you’ll get to smile and say you did it yourself in eight minutes. The knots show best on highlighted or dimensional hair, where the twists catch the light. If your hair is very fine, tease each section lightly before knotting to give the knots more substance.
22. The Modern French Twist

The French twist got a bad reputation as fussy and dated — but the modern version is softer, looser, and absolutely wedding-perfect. Gather your hair as if for a low ponytail, twist it upward against the back of your head, and tuck the ends into the twist, securing with large bobby pins or a French twist comb. The update: don’t smooth everything to perfection. Let the twist be a little relaxed, pull a few pieces loose, and skip the severe shellacked finish of decades past.
💡 Quick Tip: A French twist pin (those long U-shaped pins) holds better than a dozen bobby pins and is much easier to use — just slide it through the twist and it locks everything in place. One pin can genuinely hold the whole style. It’s the single best three-dollar investment for updo lovers. Let a few soft tendrils escape around your face for a less severe finish. A French twist pairs beautifully with a high neckline or an updo-friendly statement necklace.
23. Boho Waves With a Face-Framing Braid

For the free-spirited wedding — think outdoor ceremonies, wildflower bouquets, barefoot receptions — nothing beats loose boho waves with a tiny braid woven in. Curl your hair loosely with a 1.25-inch iron, alternating directions for that undone texture. Then take a small section near your temple and make a thin three-strand braid, securing it with a tiny clear elastic.
- Texture: Sea-salt spray on damp hair before styling gives you that beachy grit.
- Braid placement: One braid is chic; two (one each side) is festival-cute. Your call.
- Accessory: Weave a tiny flower or a gold hair ring into the braid for extra romance.
- Finish: Shake everything out — boho means touchable, never stiff.
It’s effortless, it’s pretty, and it moves beautifully in a breeze — which, at an outdoor wedding, is basically free styling. Add a second tiny braid on the other side for symmetry, or keep it asymmetrical for a more editorial feel. A touch of hair oil on the ends keeps the waves looking healthy and defined.
24. The Classic Sock Bun

The sock bun is the unsung hero of easy updos: perfectly round, perfectly smooth, and it takes about three minutes. Cut the toe off a clean sock (one that matches your hair color) and roll it into a donut. Pull your ponytail through the donut, spread your hair evenly over it, and roll downward, tucking as you go. Pin any loose ends underneath.
The result is a flawless, ballerina-smooth bun that looks like it took professional skill. For a wedding, dress it up: wrap a thin braid around the base, add pearl pins in a crescent shape, or nestle a small silk flower at one side. It’s also wonderfully practical — a sock bun doesn’t budge, doesn’t droop, and keeps every hair off your face and neck all night long. For a softer take, pull the bun slightly apart after forming it to create texture. The sock bun is also ideal for showing off a dramatic back detail on your dress — nothing competes with it.
25. Deep Side Part Glam Waves

We’ll end with pure glamour. A deep side part with big, glossy waves is timeless wedding hair — it flatters every face shape, works with every dress, and never looks overdone. Part your hair deeply on one side, then curl large sections with a 1.5-inch iron, always rolling away from your face. Let the curls cool, then brush through with a paddle brush for soft, unified waves instead of separate curls.
The deep part is doing real work here: it creates instant volume at the crown and frames your face asymmetrically, which photographs beautifully. Tuck the lighter side behind your ear to show off an earring, and let the heavier side cascade over your shoulder. Finish with a shine spray — glam waves should gleam. This is the style to choose when you want to feel absolutely stunning with zero risk. Set the waves with clips while they cool for extra definition, then brush out thoroughly. This timeless style suits every age and every dress code — when in doubt, choose glam waves.
CONCLUSION
Here’s your only real homework: pick one style, try it once before the wedding, and give yourself permission to look amazing without a salon. Great wedding hair isn’t about perfection — it’s about feeling confident enough to forget about your hair entirely. 📌 Save this post to your wedding board on Pinterest so you have gorgeous hairstyle inspiration for the big day!