
18+ Easy Wedding Hairstyles for Thin Hair 2026
If your hair is fine or thin, you know the struggle: styles that look full on everyone else fall flat on you by the second hour. Pinterest updos seem to require three times the hair you actually have. Sound about right?
Here’s the truth — thin hair can look absolutely stunning for a wedding. You just need styles built on volume tricks instead of volume you don’t have. These 18 hairstyles use teasing, texture, smart pancaking, and a few clever cheats to create fullness that lasts all night.
1. Teased Low Bun With Extra Volume for Thin Hair

The foundation of every good thin-hair updo is teasing — and I mean real teasing, not a timid once-over. Gather your hair into a low ponytail, then backcomb the tail thoroughly in small sections, from mid-length to roots. Yes, it will look wild. That’s the point. Smooth just the outer layer gently with a brush, then twist the teased tail into a bun and pin.
The teasing creates a cushion of volume inside the bun that makes it look twice as big as it is. A light mist of texturizing spray before you tease gives the backcombing something to grip. Finish with firm-hold spray — teased styles need real hold. The result is a soft, full bun that nobody would ever guess started as fine hair. Don’t be afraid to tease aggressively — fine hair needs a solid foundation. Smooth the outer layer gently so the teasing stays hidden and the surface looks polished.
2. Beachy Waves With Texturizing Spray for Fine Hair

Beachy waves are a thin-hair miracle because texture creates the illusion of density. Start with dry shampoo at the roots — even on clean hair — for grip and lift. Mist texturizing spray through the lengths, then wrap one-inch sections around a 1.25-inch iron, alternating directions and leaving the ends out for that undone feel.
Apply dry shampoo to your roots before you even pick up the iron — it creates the grip and lift that fine hair needs to hold a wave. Work in one-inch sections, and don’t worry about uniformity; varied curl sizes look more natural.
💡 Quick Tip: The scrunch is everything. After curling, flip your head upside down, mist with texturizing spray, and scrunch upward — gravity becomes your volumizing assistant, breaking curls into piece-y waves while building body at the roots. Keep products light and layered rather than heavy: fine hair wants grip and body, never stiffness, residue, or weighing-down serums and oils.
3. Half-Up With a Bump for Thin Hair

A little height at the crown changes everything for fine hair — it creates the illusion of fullness where you need it most. Here’s the formula:
- Tease the crown: Backcomb a two-inch section at the crown thoroughly — this is your “bump” foundation.
- Smooth over: Gently smooth the top layer over the teasing without flattening it.
- Gather: Pull the sides back and secure just below the bump with a small elastic or clip.
- Curl the rest: Loose waves through the lengths add body and movement.
That lifted crown makes your whole head of hair look thicker — simple, flattering, and photogenic from every angle. Keep the bump subtle (think lift, not a beehive), secure it with two crossed bobby pins so it stays put all day, and use a small cushion insert if teasing alone doesn’t give you enough structure. It’s a classic for a reason. A light mist of spray over the smoothed layer keeps everything in place.
4. The Pancaked French Braid for Thin Hair
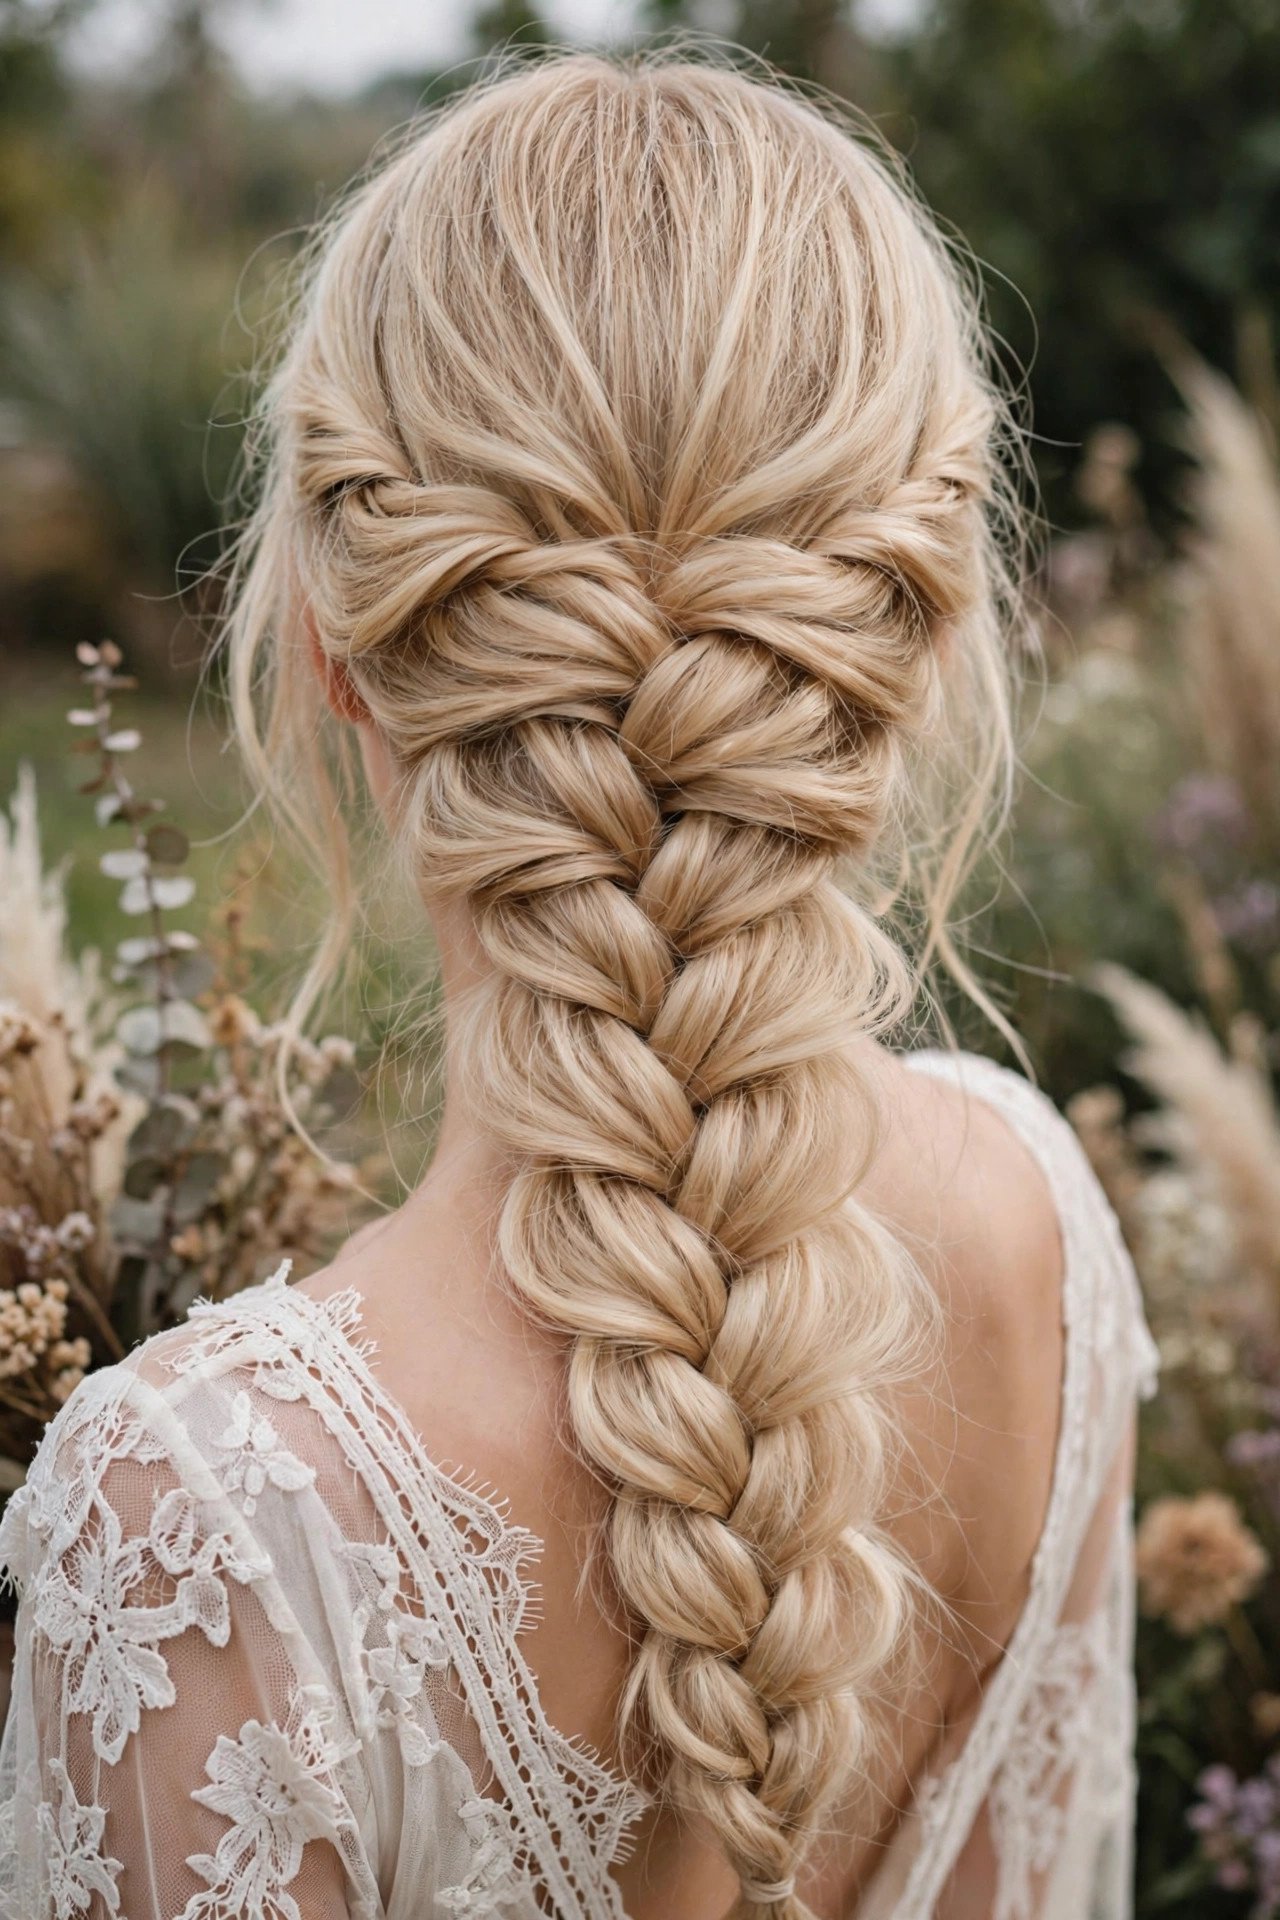
Pancaking — gently pulling each braid stitch outward — is the single most important technique for thin hair braids. It can make a skinny braid look twice as thick. Do a French braid (or a simple side braid), secure it, and then go back and tug each loop outward, starting from the bottom and working up. Be gentle but confident; fine hair pancakes easily.
Braid with clean, even sections — neatness at the start means a more polished pancaked finish. If you’re new to pancaking, practice on a simple side braid first to get a feel for the right tension.
The result is a soft, wide, romantic braid that looks lush and full — pancaking genuinely transforms thin braids into effortlessly boho ones. Work slowly and gently, since fine hair stretches easily and over-pulling turns romantic into stringy. A little texturizing spray on your fingertips gives you precise control, and a spritz of light-hold spray at the end keeps the shape intact for hours.
5. Low Chignon With Hair Padding for Fine Hair

Here’s a professional secret: stylists use padding on everyone, including thick-haired clients. A small hair donut or padding form at the base of your chignon gives you instant volume that looks completely natural. Wrap your hair around the form, pin, and smooth — the padding disappears inside, and all anyone sees is a full, beautiful bun.
- Place the form: Secure a small bun donut at the nape with bobby pins.
- Cover it: Gather your hair over the donut, spreading it evenly to hide the form completely.
- Wrap and tuck: Wrap the ends around the base and tuck them under, pinning securely.
- Finish: Mist with spray and add a decorative pin or small flower.
Choose a donut close to your hair color, and no one will ever know. This is the cheat that makes fine-hair updos look red-carpet worthy. Fluff the hair over the form with your fingers rather than a brush — fingers give you more control over coverage. Check the back in a mirror to ensure the form is fully hidden.
6. Pulled-Apart Side Braid for Thin Hair

A side braid is already flattering, but the pulled-apart technique is what makes it wedding-worthy on thin hair. Braid loosely over one shoulder — a regular three-strand braid is fine, or try a fishtail for extra texture. Secure with a clear elastic, then pancake aggressively: pull each section outward until the braid is wide, soft, and full.
A deep side part on the opposite side gives the braid a beautiful sweeping start. If shorter layers poke out along the way, let them — wispy pieces around the braid look intentionally soft, not messy.
Looseness is everything here — a tight braid on thin hair only emphasizes how little there is, while a loose, pancaked braid creates beautiful width and dimension. Start pancaking from the bottom up for the most even fullness, mist lightly to keep pulled-apart pieces from frizzing, and weave a ribbon through for a sweet bridal touch. The finished braid photographs as thick and lush.
7. Wispy Updo With Face-Framing Pieces for Thin Hair

Softness is thin hair’s superpower — lean into it. Pull your hair into a loose low bun, but leave generous face-framing pieces out at the front. Curl those pieces with a small iron for soft tendrils. The wispy, romantic effect flatters fine hair because it doesn’t try to look dense and sleek — it celebrates airiness.
📌 Good To Know: Face-framing pieces should be curled away from your face and kept soft, not tight. If they’re too curly they look dated; too straight and they look stringy. Aim for a gentle wave. And here’s the thing most people miss: the pieces frame your face and draw the eye, which means nobody’s evaluating your bun’s volume. It’s misdirection, and it works beautifully. Keep the bun itself soft and low — a tight ballerina bun defeats the romantic effect. The wispy pieces are the stars here, so give them attention with the curling iron.
8. Voluminous Top Knot for Thin Hair

A top knot on thin hair needs a foundation — otherwise it’s a sad little nub. The fix is simple: a hair donut. Pull your hair into a high ponytail, slide a small donut over it, spread your hair evenly over the form, and wrap the ends around the base. Instant full, round bun with zero teasing required.
- Donut size: Small or medium — a large donut will overwhelm fine hair and look obviously fake.
- Color match: Get as close to your hair color as possible; any peeking through should blend in.
- Texture first: A little texturizing spray helps fine hair grip the donut instead of sliding off.
- Finish: Smooth the crown, tame flyaways, and add a sleek accessory at the base.
The donut does all the volume work while your real hair provides the coverage. It’s the easiest full-looking bun in existence. Choose the smallest donut that still gives you the size you want — oversized forms look artificial on fine hair. Your own hair should do most of the visual work.
9. Curled Low Ponytail for Thin Hair

Can a ponytail look full on thin hair? Absolutely — with the right prep. Tease the crown for lift, then gather hair low at the nape. Here’s the trick: curl the tail in small sections with a 1-inch iron before you put it up (or after — either works). Curls add width and body that straight hair just doesn’t have.
Wrap the elastic with a strand of hair, and gently pancake the curls by pulling them apart slightly. A deep side part adds asymmetry and volume at the front. Avoid heavy smoothing serums — they’ll flatten everything you just built. A light texturizing spray on the tail keeps the curls piece-y and full. Simple, pretty, and it takes ten minutes. Curl small sections for maximum body — big sections on fine hair fall flat quickly. Tease the crown before gathering everything back — the lift at the roots makes the whole style look noticeably fuller.
10. Waterfall Braid for Fine Hair

The waterfall braid is lovely on fine hair because the cascading strands don’t need volume — they need definition. Curl your hair first so each dropped strand has shape and separation. Then work the braid across, dropping and replacing strands as you go. Keep the braid itself neat and close to the head; the beauty is in the “waterfall” pieces flowing through it.
⚠️ Watch Out: Fine hair slips out of waterfall braids easily, so pin the tail securely underneath the top layer — don’t just rely on the braid’s tension. A few strategically placed bobby pins along the braid’s path keep everything anchored. And use a light-hold spray rather than a heavy one; too much product makes fine hair stringy and defeats the whole romantic effect. Keep the overall effect soft; the waterfall’s beauty is in its delicacy. A few extra pins stay invisible under the top layer, so don’t be shy with them.
11. Twisted Half-Up for Fine Hair

Twists add dimension without requiring density, which makes them perfect for fine hair. Take a section from each temple, twist them back, and join them at the crown. Before you pin, pancake each twist gently — pulling the edges outward makes them look fuller and more substantial. Tease the crown underneath for lift.
Tease the crown before placing the twists — the lift underneath stops the style from lying flat against your head. A light mist of spray on each section before twisting also helps fine hair grip and hold its shape.
Curl the loose lengths first — waves give the twists a prettier backdrop and add body that makes everything look thicker. Twist loosely, since tight twists disappear on fine hair, and pancake each twist generously for substance. Finish with a decorative clip where the twists meet for wedding polish. Ten minutes, great hold, soft and romantic — proof that fine hair just needs the right techniques.
12. Pancaked Dutch Braid for Thin Hair

A Dutch braid sits on top of the hair, which means pancaking has maximum visual impact — every pulled stitch is visible. That’s great news for thin hair. Here’s your approach:
- Prep with texture: Dry shampoo at the roots and texturizing spray through the lengths.
- Braid Dutch-style: Cross under instead of over, keeping sections neat.
- Pancake as you go: After every few stitches, gently tug the edges outward. Don’t wait until the end.
- Finish soft: Tie off with a clear elastic and pancake the tail too.
- Set lightly: A flexible-hold spray keeps the fullness without crunch.
Pancaking as you go (rather than at the end) gives you more control and a more even result on fine hair. The finished braid looks twice as thick as it is. Work slowly and check your progress in a mirror — even pancaking makes all the difference. Fine hair shows every inconsistency, so patience pays off.
13. Backcombed Messy Bun for Thin Hair

The messy bun is actually easier on thin hair than the sleek bun — texture and imperfection are your allies. Start with texturizing spray, gather into a high ponytail, and backcomb the tail thoroughly. Twist loosely, wrap around the base, and pin. Then pull, tug, and loosen everything: the messier, the fuller it looks.
Start with a high ponytail rather than a low one — the height gives the bun more presence and keeps it from looking sparse. Backcomb in small sections for the most stable volume, and let the top layer fall naturally over the teasing.
Pull out face-framing pieces and a few strands at the nape — softness all around is the goal, never a scraped-tight finish. The piece-y texture creates the illusion of much more hair than you have, so embrace it: on fine hair, perfection is the enemy of volume. Mist with medium-hold spray, leave it alone, and let the style be beautifully, intentionally imperfect.
14. Fishtail Braid for Thin Hair

The fishtail’s woven texture is a gift for fine hair — all that intricate detail creates visual fullness. Work with small strands for maximum intricacy, and pancake generously when you’re done. A fishtail on thin hair should look soft and slightly undone, not tight and skinny.
- Texture first: Texturizing spray is non-negotiable — it gives fine hair the grip to hold the weave.
- Go small: Thinner strands mean more crosses, which means more visible texture.
- Pancake wide: Pull each section outward for a full, boho look.
- Finish: Clear elastic, hair-wrapped, with a light mist of flexible-hold spray.
Swept over one shoulder, a pancaked fishtail looks beautifully lush — nobody counts strands, they just see gorgeous texture. Use small sections for maximum intricacy, take your time with the pancaking rather than rushing it, and mist lightly at the end. Heavy spray makes fine hair look stringy and undoes all your careful work.
15. Elegant Low Twist for Fine Hair

When in doubt, twist. Gather your hair at the nape, divide into two sections, twist each one, then twist them together into a rope and coil it into a low bun. On fine hair, the twisted texture creates dimension that a smooth bun lacks — every twist catches light differently, which reads as fullness.
A side part adds softness that flatters most face shapes, while a center part keeps things sleek and modern. Either way, keep the front relaxed — pulling everything too tight defeats the effortless effect you’re after.
💡 Quick Tip: Tease each section lightly before twisting — the hidden volume inside makes twists look substantially thicker — and keep the twist relaxed rather than rope-tight for a fuller appearance. Let the ends fan out softly at the bun instead of tucking them severely, and pin with bobby pins crossed in X shapes, which grip fine hair far better than parallel pins.
16. Pinned Curls for Thin Hair

Here’s a beautiful truth: an updo made of pinned curls doesn’t need a lot of hair — it needs a lot of texture. Curl your whole head with a 1-inch iron, working in small sections so every piece gets real curl. Then coil each curl flat against your head and pin it. The curls stack and overlap, creating dimension and fullness out of thin air.
Use a 1-inch iron for defined curls that read as texture once pinned; larger barrels make waves that disappear into the updo. Pin each curl with its opening facing downward so every pin stays hidden.
Because each curl is pinned individually, you control exactly where the volume goes — build it at the crown, keep the sides soft, leave tendrils at the front. It’s like sculpting with your own hair. Curl every section, since skimping leaves visible gaps, and mist with flexible-hold spray so the finish stays touchable, never crunchy. Intricate, romantic, and remarkably secure all night.
17. Side-Swept Curls for Thin Hair

Sweeping everything to one side is one of the oldest volume tricks in the book — it piles all your hair together so it looks like more. Create a deep side part, curl everything with a 1.25-inch iron, then sweep it all over one shoulder and pin discreetly at the nape. The concentrated mass of curls on one side looks lush and glamorous.
A deep side part is essential — it creates the asymmetry that makes this style dramatic. Pin the sweep securely at the nape with two crossed pins so it stays put through the entire celebration.
Curling is essential — straight fine hair swept aside just looks flat, while defined curls create real width and body. Concentrating everything on one side is the oldest volume trick in the book for a reason: it works. Pin discreetly at the nape so the sweep survives hugs and dancing, keep the curls defined rather than limp, and go easy on shine spray since fine hair gets weighed down fast.
18. Braided Crown for Fine Hair

We’ll close with the most romantic option: a braided crown. On fine hair, the key is pancaking the braid wide so the crown has real presence. Dutch-braid around your hairline, pancaking as you go, and pin the tail under the start. Tease the crown lightly underneath the braid for lift.
Braid with the hair slightly damp — it keeps flyaways under control and makes the braid neater to handle. As you work around your head, keep checking a mirror to maintain even tension and placement.
📌 Good To Know: A crown braid anchors every strand to your head — no slipping, no sagging, no mid-reception collapse — and pancaking as you braid rather than only at the end gives the most even fullness. Weave in tiny flowers or pearl pins along the braid for a wedding-ready finish, then dance all night without a single worry about your hair. It’s feminine, timeless, and effortlessly elegant.
CONCLUSION
Fine hair isn’t a limitation — it’s just a different starting point. With teasing, texture, pancaking, and a few smart cheats, you can build volume that looks completely natural and lasts all night. Pick the style that made you smile, practice it once, and enjoy the wedding. 📌 Save this post to your wedding board on Pinterest so you have gorgeous hairstyle inspiration for the big day!