
20+ Easy Professional Hairstyles Women — Step by Step 2026
Let’s be honest: nobody has forty-five minutes to spend on hair before work. Between the alarm, the commute, and everything else, your hairstyle needs to happen fast — but still look like you tried. Every minute counts on a workday morning, and your hair shouldn’t eat up the ones you need for coffee.
That’s exactly what this list is for. Every style below comes with simple, follow-along steps and takes ten minutes or less — most take under five. No advanced skills, no drawer full of tools, just easy techniques that actually work on real mornings.
Grab your brush, a few elastics, and some bobby pins. By the end of this list, you’ll have twenty go-to styles that make busy workdays so much easier. Most take less time than brewing your coffee, and each one is genuinely office-appropriate.
1. The Five-Minute Low Bun

This is the style you’ll reach for more than any other — the reliable, works-every-time low bun that looks polished in about five minutes flat. It’s the foundation every busy woman should have in her styling toolkit.
Gather your hair at the nape like a low ponytail and twist it into a loose rope. Coil the rope around its base, tuck the ends underneath, and secure with three bobby pins placed in a triangle. Smooth the crown with your palms and a drop of serum. Done — seriously, that’s the whole thing.
The beauty of this bun is how forgiving it is. Slightly messy? Looks intentional. A few pieces falling out? Even better. It works on second-day hair, third-day hair, and hair you barely brushed. Keep a few extra pins in your bag for midday touch-ups, and this style will carry you from your first coffee to your last email.
2. The Twist Ponytail

The twist ponytail takes the most basic hairstyle in the world and gives it a pretty, textured upgrade. It looks like you spent real effort on it, but the technique is so simple you’ll laugh.
- Pull your hair into a ponytail at whatever height you like — mid-height works best for the office.
- Split the ponytail into two equal sections.
- Twist each section in the same direction, then twist the two twisted sections around each other in the opposite direction.
- Secure the end with a small elastic and gently loosen the twists for fullness.
Twisting in opposite directions is the magic trick — it’s what locks the rope twist in place so it doesn’t unravel. This style adds instant texture and looks especially pretty on layered hair, where the different lengths create dimension. Mist with light-hold spray and you’re set for the whole day. For office polish, keep the twists neat and smooth rather than messy — a tidy rope twist reads professional while a loose one reads weekend.
3. The Thirty-Second Claw Clip Twist

When you’re truly running late — like, keys-in-hand late — the claw clip twist is your rescue style. Thirty seconds, one accessory, and you walk out looking intentionally chic instead of frazzled.
Gather your hair at the back of your head, twist it upward in one smooth motion, and clamp a large claw clip over the whole twist. Let the ends cascade over the top of the clip or tuck them in — both look great. Smooth the front with your fingers and go.
💡 Quick Tip: The clip does all the work here, so invest in a good one — large, with strong teeth and a matte or tortoiseshell finish. Cheap clips slip on thick hair and snap on the first use. A quality claw clip holds all day, looks like a deliberate accessory, and costs less than two coffees. Keep one in your bag, one at your desk, one in the car.
4. The Easy Side Braid

A simple three-strand braid draped over one shoulder is one of the easiest polished styles you can learn. If you can braid at all — even slowly — you can do this in under five minutes.
Sweep all your hair over one shoulder and divide it into three sections. Cross the right section over the middle, then the left over the middle, repeating down the length. Keep your tension even but not tight — a relaxed braid looks softer and more modern. Secure with a small elastic and gently tug the edges outward to make the braid look fuller.
⚠️ Watch Out: Don’t braid sopping-wet hair — wet strands stretch and snap, and the braid will look limp once it dries. Braid on dry or barely-damp hair for the best results. And if your layers keep poking out, smooth a little styling cream over the braid before you start; it tames those flyaway ends beautifully.
5. The Sleek Low Ponytail

Minimal, clean, and endlessly professional — the sleek low ponytail is the white shirt of hairstyles. It goes with everything, never looks wrong, and takes about three minutes when you know the steps.
Brush your hair back smooth, checking for bumps with your free hand as you go. Secure low at the nape with a strong elastic. Take a small section from underneath, wrap it around the base to hide the elastic, and pin underneath. Run a flat iron over the ponytail for a glassy finish and smooth a pea-sized amount of serum over the crown.
The wrapped base is what separates this from a gym ponytail — don’t skip it. This style looks sharpest with a middle or side part, so take ten seconds to make your part clean with a comb. It’s comfortable for long days, keeps hair off your collar, and looks just as good at 6 p.m. as it did at 9 a.m.
6. The Half-Up Top Knot
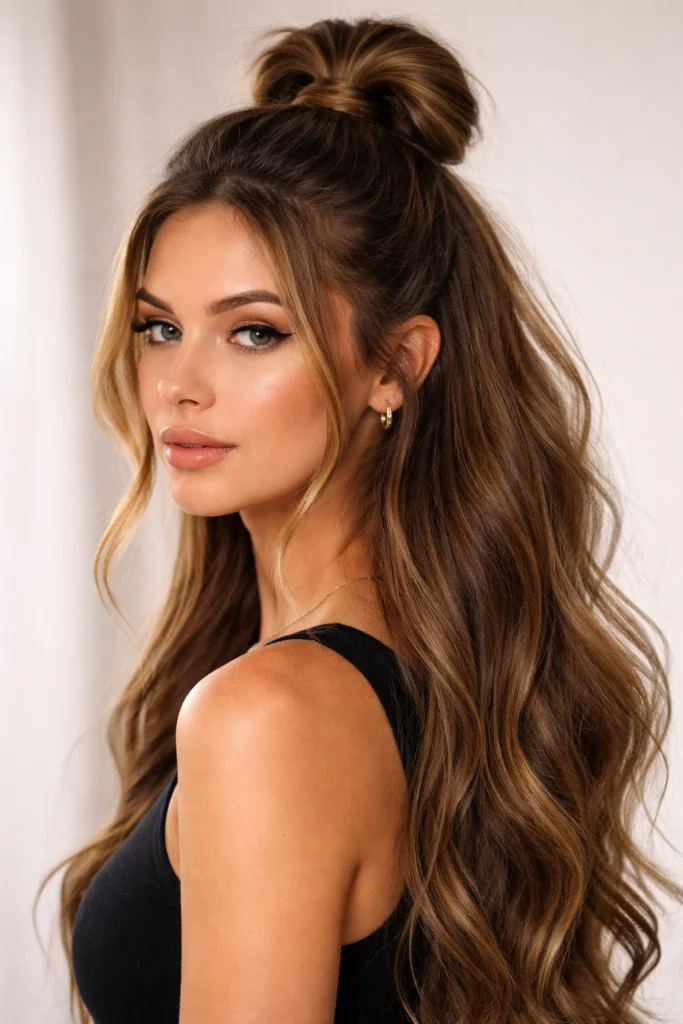
Can’t decide between up and down? The half-up top knot splits the difference perfectly — face clear and polished on top, length flowing free below. It’s casual enough for everyday but tidy enough for the office.
- Section off the top third of your hair, from temple to temple, like a half ponytail.
- Pull that section into a high mini ponytail and secure with a small elastic.
- Twist the mini ponytail into a small bun and pin it with two bobby pins.
- Loosen the bun slightly with your fingers for a soft, effortless shape.
This style is brilliant on second-day hair because the knot sits right where oiliness shows most — it hides everything. Leave the bottom half straight, wavy, or natural; all three look great. It’s also the perfect style for growing out bangs, keeping them swept up and out of your eyes all day. Position the knot high on the crown where it’s visible from the front — that’s what gives this style its polished, intentional look.
7. The Quick French Braid

French braids have a reputation for being complicated, but a single loose one down the back is genuinely easy once your fingers learn the rhythm. Give yourself two practice runs and you’ll have it down.
Start with three small sections at the crown. Braid one stitch normally, then start adding a little hair from each side every time you cross a section over. Keep going down the back of your head, adding hair until you run out, then finish with a regular three-strand braid and tie it off. Keep everything loose — tight French braids look severe.
💡 Quick Tip: Practice the motion on someone else’s hair or a willing friend first — it’s much easier to learn when you can see what your hands are doing. Once the rhythm clicks, doing it on yourself becomes automatic. A loose French braid also makes gorgeous next-day waves: sleep in it, undo it in the morning, and you get a second hairstyle free.
8. The Twisted Headband

If braiding feels like too much before coffee, twisting is your shortcut to the same pretty effect. The twisted headband looks like a delicate braided crown but requires zero braiding skill — just twist and pin.
Part your hair down the middle. Take a two-inch section from the left side near your part and twist it backward toward your ear, adding small sections of hair into the twist as you go along your hairline. Pin it behind your ear with two bobby pins in an X. Repeat on the right side — or leave one side loose for an effortless asymmetrical look.
⚠️ Watch Out: Twists unravel more easily than braids, so pin generously and mist with light-hold spray when you finish. Place your pins pointing upward into the twist — gravity pulls everything down, and upward-angled pins fight that pull. On very fine hair, a little texturizing spray before twisting gives the strands grip.
9. The Office Bubble Ponytail
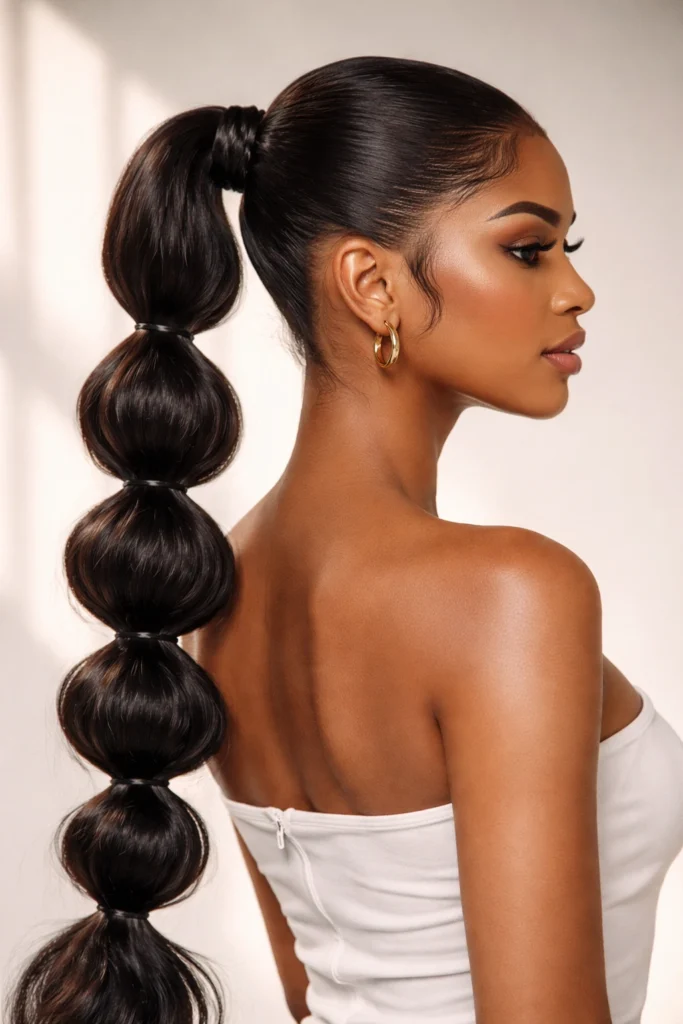
The bubble ponytail looks like something from a salon, but it’s secretly one of the easiest styles here — just a ponytail with extra elastics. It adds playful texture while staying neat enough for work.
Pull your hair into a ponytail at mid-height and secure it. Add small clear elastics down the length, spacing them about two inches apart. Gently tug each section outward to puff it into a round “bubble” shape. The trick is pulling evenly all the way around so each bubble looks full and symmetrical.
What makes this great for workdays is how secure it is — every elastic anchors the style, so wind and long commutes won’t destroy it. Keep the bubbles small and neat for a subtle office look, or go bigger and bolder for casual Fridays. It works best on medium to long hair with enough length for at least three bubbles. A light mist of flexible-hold spray keeps each bubble defined without stiffness, so the style moves naturally through your day.
10. The Messy-to-Polished Bun

Some mornings your hair just won’t cooperate — and that’s when the messy-to-polished bun saves the day. It takes bedhead texture and turns it into a style that looks deliberately undone in the best way.
- Gather your hair into a high ponytail but don’t brush it smooth — the texture is the point.
- Twist the ponytail loosely and wrap it around the base into a bun shape.
- Secure with a large elastic or a few pins, leaving the ends tucked or sticking out.
- Pull gently at the crown and sides to loosen everything and create soft volume.
The secret is committing to the messiness — a half-smooth messy bun just looks unfinished, but a fully embraced one looks chic. Pull out a few face-framing pieces and curl them lightly for softness. This is the ultimate second (or third) day hairstyle, and dry shampoo at the roots beforehand makes it even better.
11. The Ribbon-Tied Ponytail
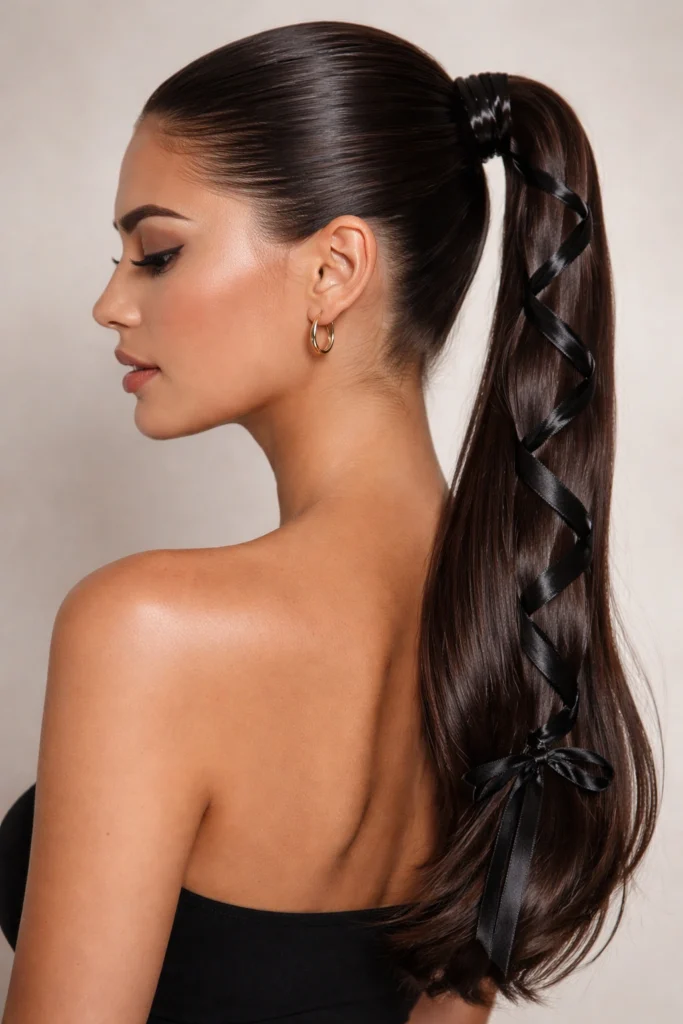
A simple ribbon turns an ordinary ponytail into something charming and polished. It’s the easiest accessory upgrade in this entire list — one piece of ribbon, tied in a bow, and your basic pony looks styled.
Make your usual ponytail — high, mid, or low — and smooth it nicely. Take a ribbon about eighteen inches long (satin or grosgrain both work beautifully) and tie it around the base of the ponytail in a bow. Let the ends hang down along the ponytail. That’s it. The ribbon covers the elastic and adds a finished, feminine detail.
💡 Quick Tip: Match your ribbon to your outfit for a pulled-together look — black ribbon with a blazer, a soft neutral with pastels. For the office, keep the bow small and neat rather than oversized. And here’s a pro move: thread the ribbon through the elastic before you tie the ponytail, so it’s anchored and won’t slide down during the day.
12. The Easy Fishtail Braid

The fishtail braid looks incredibly intricate — like something that requires a stylist — but it’s actually just two sections woven back and forth. Once you learn the rhythm, it’s barely harder than a regular braid.
Pull your hair to one side and split it into two sections. Take a thin strand from the outside of the left section, cross it over, and add it to the right section. Then take a thin strand from the outside of the right section, cross it over, and add it to the left. Repeat all the way down and tie it off. Smaller strands make a more detailed fishtail; thicker strands go faster.
⚠️ Watch Out: The number-one fishtail mistake is letting the two main sections twist around each other. Keep them separated with your thumbs as you work — the only things crossing over should be the thin outer strands. It feels awkward for the first few stitches, then suddenly clicks. Pancake the finished braid by gently pulling the edges for a fuller look.
13. Pinned Half-Up Waves

When you want your hair down but need it out of your face, pinned half-up waves are the answer. It’s soft, feminine, and takes about four minutes — perfect for days when your natural texture is cooperating.
Enhance your waves with a large-barrel iron or just scrunch in some curl cream if your hair is naturally wavy. Take a small section from each side above your ears, bring them to the back of your head, and pin them together with two bobby pins in a crisscross. Let the rest fall naturally over your shoulders.
This style works on every hair type because the waves can be whatever your hair wants to do — defined curls, loose bends, or natural texture all look great. For extra staying power, twist each side section once before pinning; the twist grips better than flat hair. A decorative pin or small clip at the back adds a pretty finishing touch.
14. The Sleek Tucked-Back Style
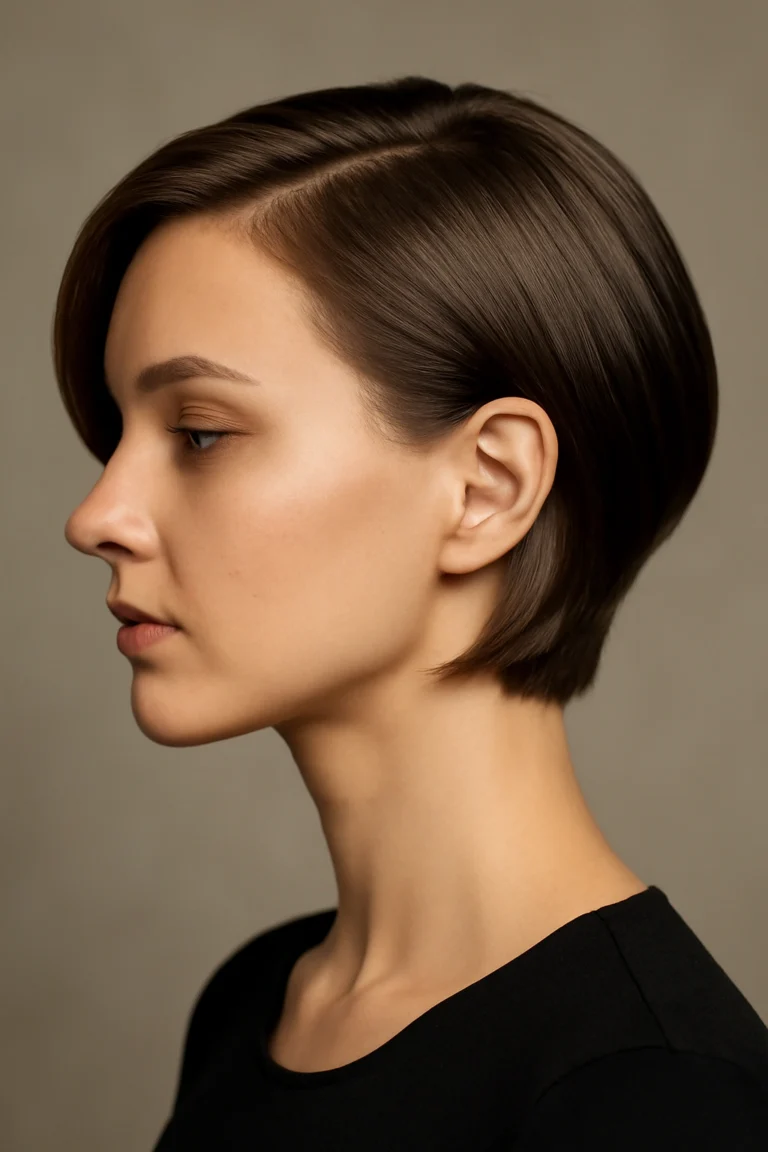
On mornings when even a ponytail feels like too much, the tucked-back style has you covered. Smooth, tuck, done — it’s a legitimate hairstyle that takes ninety seconds and looks genuinely polished.
- Brush your hair smooth and create a clean side or center part with a comb.
- Flat iron just the front sections for sleekness — the back can be air-dried.
- Tuck both sides neatly behind your ears, smoothing any bumps with your palms.
- Secure each side with a hidden bobby pin behind the ear if needed.
The tucked style shows off your earrings and opens up your face, which photographs beautifully on video calls. It works best on straight or straightened hair — curly textures can do a variation by smoothing just the front with gel. Keep a mini smoothing brush in your desk drawer for quick midday touch-ups. For extra polish, add a single decorative pin on one side — a small gold barrette turns this minimal style into something deliberately chic.
15. The Low Braided Bun

Braid first, bun second — combining the two easiest techniques gives you a style with beautiful texture that holds all day. The braid keeps everything secure, so this bun genuinely lasts from morning to night.
Make a simple three-strand braid starting at the nape — just a regular braid hanging down your back, nothing fancy. Coil the braid around its base into a bun shape and pin it in place. The braided texture shows through the bun, giving it gorgeous dimension that a plain bun doesn’t have.
💡 Quick Tip: Braid with slightly damp hair for the smoothest result — damp strands stay put and don’t frizz while you work. Gently pull apart the braid edges before coiling to make it look thicker. This style is incredibly secure, making it perfect for long days, windy commutes, or days when you can’t touch up your hair at all. This style also works beautifully on longer hair — just coil the braid twice around the base instead of once for a fuller bun.
16. The Two-Minute Twisted Ponytail

Here’s a ponytail trick that takes two minutes and looks like a salon style: the twist-and-tuck. It creates a beautiful twisted detail at the base that elevates the whole look with almost no extra effort.
Make a low ponytail but leave it slightly loose. Use your fingers to create a gap right above the elastic, splitting the hair into two sections. Flip the entire ponytail up and through that gap, pulling it down to tighten. The hair twists beautifully around the base, hiding the elastic and creating an elegant looped effect.
⚠️ Watch Out: This trick needs a slightly loose ponytail to work — if the elastic is too tight, you can’t create the gap. Start looser than you think, flip the pony through, then tighten by gently pulling the ponytail downward. On very thick hair, make the gap wider with your fingers first. One flip gives a subtle twist; flip it twice for a more dramatic looped look.
17. The Wrapped Low Ponytail

The wrapped ponytail is the thirty-second upgrade that makes a basic pony look expensive. Hiding the elastic with your own hair is a tiny detail that makes a huge difference in how polished you look.
Secure your low ponytail with an elastic, then take a half-inch section from underneath the ponytail. Wrap it tightly around the base, covering the elastic completely, and pin the end underneath with a bobby pin pushed upward into the base. Smooth the ponytail with a brush and add a drop of serum for shine.
This works at any ponytail height and on any hair texture — it’s universal. For extra security on thick hair, wrap the section twice around before pinning. The wrapped base photographs beautifully and reads as intentional styling rather than a rushed morning. Once you’ve done it three times, you’ll do it automatically every single ponytail day. Choose a bobby pin that matches your hair color so it disappears completely into the wrapped section.
18. Quick Side-Swept Waves

Side-swept waves have a soft, romantic feel that still reads professional when the waves are smooth and controlled. The deep side part does most of the styling work for you — it’s instant shape and volume.
- Create a deep side part with a comb, about two inches off-center.
- Curl the front sections away from your face with a large-barrel iron — just the front four or five sections.
- Let the curls cool for two minutes, then brush through gently to soften them into waves.
- Sweep everything to one side and pin the smaller side flat behind your ear.
You don’t need to curl all your hair — just the visible front sections create the whole effect, which is why this takes under ten minutes. The back can be its natural texture and nobody will know. Finish with a flexible-hold spray so the waves move naturally instead of looking stiff. Pin the tucked side securely — hidden pins keep the asymmetry in place through long meetings and busy commutes.
19. The Easy Pin-Tuck Chignon

The chignon sounds fancy, but this pin-tuck version is genuinely easy — no rolling, no twisting technique, just tuck and pin. It’s the chignon for people who thought they couldn’t do a chignon.
Gather your hair into a loose low ponytail and secure it. Twist the ponytail once, then fold it upward against the back of your head, tucking the ends into the top of the ponytail base. Pin the folded roll in place with four to six bobby pins, working around the edges. Pull gently at the sides to soften the shape.
💡 Quick Tip: Think of this as creating a soft roll rather than a tight bun — the looser and softer, the more elegant it looks. If the roll feels unstable, add a second elastic around the folded shape before pinning; it gives the pins something solid to grip. This style is perfect for fine hair because the folded shape creates fullness that a regular bun can’t.
20. The Polished Everyday Top Knot

The top knot gets a bad rap as a lazy style, but done smoothly and deliberately, it’s chic, modern, and completely office-appropriate. The difference between “just rolled out of bed” and “polished” is all in the smoothing.
Flip your head upside down and gather everything high on the crown, smoothing with a brush as you go — this upside-down trick is key for a bump-free finish. Secure with a strong elastic, twist the ponytail, and coil it into a neat knot. Pin every inch, smooth the surface with serum, and finish with firm-hold spray.
⚠️ Watch Out: Placement matters enormously. A top knot sitting too far back looks like a regular bun; the polished version sits right on top of the crown where it’s visible from the front. Check in a hand mirror from the side. And smooth, smooth, smooth — every bump shows on this style, so take the extra minute with the brush. It’s worth it.
CONCLUSION
Easy doesn’t have to mean boring — as you’ve just seen, the simplest techniques can create the most polished looks. Master five or six of these styles and you’ll never stare blankly into the mirror on a busy morning again. 📌 Save this post to your hairstyles board on Pinterest for quick everyday hair inspiration!